作者:JakePrim
转载地址:https://juejin.cn/post/7030630220721815588
Handler 存在的意义?
Handler 实现了App的内部通信,Binder实现了App间的进程通信,这是Framework的核心的技术。
Handler 是做线程间的通信的,那么线程通信一定要用Handler吗?(不一定) Handler 更重要的是实现了线程的切换,MessageQueue 消息队列解决了线程切换中的通信问题。 通过最简单的方式来一步步演进Handler的实现。如下代码,实现线程间的通信和切换:
下面的代码实现非常简单,线程1和线程2进行通信,只需要一个全局的message变量,线程1无限循环通过state判断线程2是否发送了消息,然后执行相关的方法,这个方法是在线程1中执行的。想·
 /**
 * 实现最原始的线程切换
 */
 public
 class
 ThreadChange
 {
 public
 static
 void
 main
 (
 String
 []
 args
 )
 {
 ThreadChange
 change
 =
 new
 ThreadChange
 ();
 change
 .
 method
 ();
 }
 String
 message
 ;
 boolean
 state
 ;
 public
 void
 method
 (){
 //线程1
 new
 Thread
 (
 new
 Runnable
 ()
 {
 @Override
 public
 void
 run
 ()
 {
 //线程1 给线程2发送消息
 message
 =
 "hello"
 ;
 //线程2收到消息后,线程1 执行方法
 for
 (;;){
 //无限循环 监听消息
 if
 (
 state
 ){
 execute
 ();
 //执行
 }
 }
 }
 }).
 start
 ();
 //线程2
 new
 Thread
 (
 new
 Runnable
 ()
 {
 @Override
 public
 void
 run
 ()
 {
 String
 data
 =
 message
 ;
 //收到了消息
 if
 (
 data
 .
 equals
 (
 "hello"
 )){
 state
 =
 true
 ;
 }
 }
 }).
 start
 ();
 }
 public
 void
 execute
 (){
 System
 .
 out
 .
 println
 (
 Thread
 .
 currentThread
 ());
 }
 }
那么Handler是如何显示线程的切换和通信的呢?其实Handler就是对线程进行封装处理。
假设要封装一个线程的通信框架,你会如何设计?最简单就是有两个方法一个是 发送消息 ,一个 处理消息
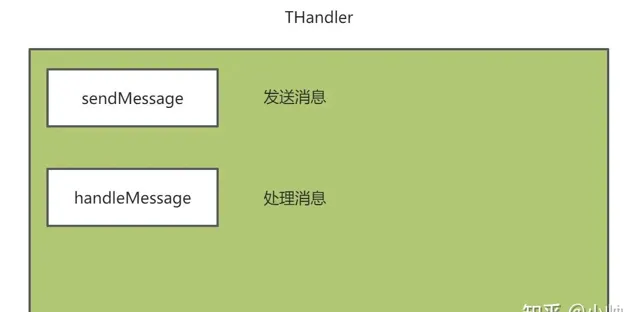
如下示例代码:
 public
 class
 THandler
 {
 public
 void
 sendMessage
 (
 Message
 message
 ){
 handleMessage
 (
 message
 );
 }
 public
 void
 handleMessage
 (
 Message
 message
 ){
 }
 }
然后写一个ActivityThread来模拟app的入口:从下面的代码看起来没有任何问题,子线程可以收到主线程发送过来的消息。
 public
 class
 ActivityThread
 {
 public
 static
 void
 main
 (
 String
 []
 args
 )
 {
 //假设这是在主线程
 ActivityThread
 activityThread
 =
 new
 ActivityThread
 ();
 activityThread
 .
 method
 ();
 }
 private
 THandler
 handler
 ;
 public
 void
 method
 (){
 Thread
 thread
 =
 new
 Thread
 (
 new
 Runnable
 ()
 {
 @Override
 public
 void
 run
 ()
 {
 handler
 =
 new
 THandler
 (){
 @Override
 public
 void
 handleMessage
 (
 Message
 message
 )
 {
 super
 .
 handleMessage
 (
 message
 );
 //是在主线程处理的消息
 System
 .
 out
 .
 println
 (
 "message = "
 +
 message
 .
 obj
 );
 }
 };
 }
 });
 thread
 .
 start
 ();
 try
 {
 Thread
 .
 sleep
 (
 1000
 );
 }
 catch
 (
 InterruptedException
 e
 )
 {
 e
 .
 printStackTrace
 ();
 }
 //发送消息
 handler
 .
 sendMessage
 (
 new
 Message
 (
 "hello"
 ));
 handler
 .
 sendMessage
 (
 new
 Message
 (
 "hello1"
 ));
 handler
 .
 sendMessage
 (
 new
 Message
 (
 "hello2"
 ));
 }
 }
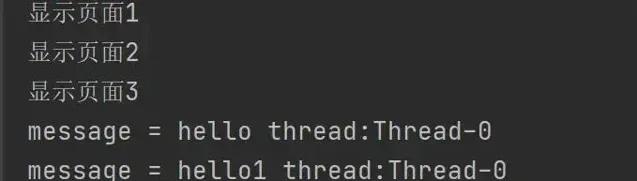
但是假设 消息处理时间很长 ,由于sendMessage直接调用了handleMessage,如果主线程通过sendMessage发送消息,而handleMessage处理消息是在 主线程中处理消息 。 假设如下的示例代码:处理消息需要5000ms
 handler
 =
 new
 THandler
 (){
 @Override
 public
 void
 handleMessage
 (
 Message
 message
 )
 {
 super
 .
 handleMessage
 (
 message
 );
 try
 {
 Thread
 .
 sleep
 (
 5000
 );
 }
 catch
 (
 InterruptedException
 e
 )
 {
 e
 .
 printStackTrace
 ();
 }
 System
 .
 out
 .
 println
 (
 "message = "
 +
 message
 .
 obj
 +
 " thread:"
 +
 Thread
 .
 currentThread
 ().
 getName
 ());
 }
 };
而实际想要的结果是,消息发送完立即去执行其他的代码,如下示例代码,实际是想要发送完消息就显示页面1、页面2、页面3,由于handleMessage 处理消息时间长导致了页面无法显示 。
 handler
 .
 sendMessage
 (
 new
 Message
 (
 "hello"
 ));
 System
 .
 out
 .
 println
 (
 "显示页面1"
 );
 handler
 .
 sendMessage
 (
 new
 Message
 (
 "hello1"
 ));
 System
 .
 out
 .
 println
 (
 "显示页面2"
 );
 handler
 .
 sendMessage
 (
 new
 Message
 (
 "hello2"
 ));
 System
 .
 out
 .
 println
 (
 "显示页面3"
 );
那么要如何优化呢?
解决点:- 处理大量消息问题
- 处理消息不要阻塞主线程,在当前的线程处理消息
对于大量消息的问题,可以使用 消息队列 的方式来解决,将发送的消息放到消息队列中,然后 无限循环 获取消息。 这时候框架的架构就变成了如下图所示:

下示例代码:
 /**
 * 使用消息队列解决大量消息的问题
 */
 public
 class
 MessageQueue
 {
 //BlockingQueue 阻塞队列 后续了解,以及线程的了解问题
 private
 BlockingQueue
 <
 Message
 >
 queue
 =
 new
 ArrayBlockingQueue
 <>(
 100
 );
 /**
 * 将消息存入消息队列
 */
 public
 void
 enqueueMessage
 (
 Message
 message
 ){
 try
 {
 queue
 .
 put
 (
 message
 );
 }
 catch
 (
 InterruptedException
 e
 )
 {
 e
 .
 printStackTrace
 ();
 }
 }
 /**
 * 从消息队列取消息
 */
 public
 Message
 next
 (){
 Message
 message
 =
 null
 ;
 try
 {
 message
 =
 queue
 .
 take
 ();
 }
 catch
 (
 InterruptedException
 e
 )
 {
 e
 .
 printStackTrace
 ();
 }
 return
 message
 ;
 }
 }
THandler 中的代码变成了如下:
在子线程中调用loop,使handleMessage在子线程中处理消息,不会阻塞主线程。
 public
 class
 THandler
 {
 private
 MessageQueue
 queue
 =
 new
 MessageQueue
 ();
 public
 void
 loop
 (){
 for
 (;;){
 Message
 next
 =
 queue
 .
 next
 ();
 handleMessage
 (
 next
 );
 }
 }
 public
 void
 sendMessage
 (
 Message
 message
 )
 {
 queue
 .
 enqueueMessage
 (
 message
 );
 }
 public
 void
 handleMessage
 (
 Message
 message
 )
 {
 }
 }
通过
loop
来循环获取消息,然后调用
handleMessage
处理消息
 Thread
 thread
 =
 new
 Thread
 (
 new
 Runnable
 ()
 {
 @Override
 public
 void
 run
 ()
 {
 handler
 =
 new
 THandler
 (){
 @Override
 public
 void
 handleMessage
 (
 Message
 message
 )
 {
 super
 .
 handleMessage
 (
 message
 );
 try
 {
 Thread
 .
 sleep
 (
 5000
 );
 }
 catch
 (
 InterruptedException
 e
 )
 {
 e
 .
 printStackTrace
 ();
 }
 System
 .
 out
 .
 println
 (
 "message = "
 +
 message
 .
 obj
 +
 " thread:"
 +
 Thread
 .
 currentThread
 ().
 getName
 ());
 }
 };
 handler
 .
 loop
 ();
 }
 });
 thread
 .
 start
 ();
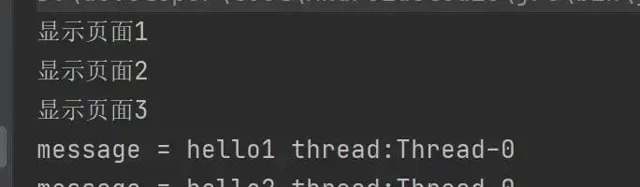
那么结果就保证了主线程中界面的正常显示,子线程处理消息。
那么子线程向主线程发送消息呢?将代码倒过来就可以了,如下代码:
 private
 THandler
 tHandler2
 ;
 public
 void
 method2
 (){
 tHandler2
 =
 new
 THandler
 (){
 @Override
 public
 void
 handleMessage
 (
 Message
 message
 )
 {
 super
 .
 handleMessage
 (
 message
 );
 System
 .
 out
 .
 println
 (
 "主线程处理消息 message = "
 +
 message
 .
 obj
 );
 }
 };
 Thread
 thread
 =
 new
 Thread
 (
 new
 Runnable
 ()
 {
 @Override
 public
 void
 run
 ()
 {
 tHandler2
 .
 sendMessage
 (
 new
 Message
 (
 "我是子线程发送的消息"
 ));
 }
 });
 thread
 .
 start
 ();
 tHandler2
 .
 loop
 ();
 //开启消息循环机制
 System
 .
 out
 .
 println
 (
 "loop后面的代码无法执行,因为loop是一个无限循环"
 );
 }
运行结果:

:::tips 会发现一个问题,loop()方法后面的代码无法执行了,因为loop是一个死循环,这个问题后面详细讲解,loop()如何解决主线程阻塞的问题。 ::: 上面的代码看似实现了线程间的通信,没什么问题,但是如果在子线程中创建多个THandler时就存在问题了。如下示例代码
其实我们已经注意到了,loop()方法是一个无限循环,loop()后面的代码都无法执行
 private
 THandler
 handler
 ;
 private
 THandler
 tHandler3
 ;
 public
 void
 method3
 (){
 Thread
 thread
 =
 new
 Thread
 (
 new
 Runnable
 ()
 {
 @Override
 public
 void
 run
 ()
 {
 handler
 =
 new
 THandler
 (){
 @Override
 public
 void
 handleMessage
 (
 Message
 message
 )
 {
 super
 .
 handleMessage
 (
 message
 );
 try
 {
 Thread
 .
 sleep
 (
 5000
 );
 }
 catch
 (
 InterruptedException
 e
 )
 {
 e
 .
 printStackTrace
 ();
 }
 System
 .
 out
 .
 println
 (
 "message = "
 +
 message
 .
 obj
 +
 " thread:"
 +
 Thread
 .
 currentThread
 ().
 getName
 ());
 }
 };
 tHandler3
 .
 loop
 ();
 //loop后面的代码都无法执行
 handler
 .
 loop
 ();
 }
 });
 thread
 .
 start
 ();
 try
 {
 Thread
 .
 sleep
 (
 1000
 );
 }
 catch
 (
 InterruptedException
 e
 )
 {
 e
 .
 printStackTrace
 ();
 }
 //发送消息
 handler
 .
 sendMessage
 (
 new
 Message
 (
 "hello"
 ));
 System
 .
 out
 .
 println
 (
 "显示页面1"
 );
 tHandler3
 .
 sendMessage
 (
 new
 Message
 (
 "hello1"
 ));
 System
 .
 out
 .
 println
 (
 "显示页面2"
 );
 tHandler3
 .
 sendMessage
 (
 new
 Message
 (
 "hello2"
 ));
 System
 .
 out
 .
 println
 (
 "显示页面3"
 );
 }
显然只执行了
tHandler3
而
handler
没有执行
handleMessage
,这是因为
handler.loop
在
tHandler3.loop
后面了,在
for(;;)
后面肯定是无法执行的。
 难道我们只能在一个线程中定义一个THandler?,这显然是不行的,思考一下导致
无限循环
的是
消息队列
,如果想要在一个线程中创建多个THandler,那么
消息队列就不能在THandler中创建
,而是要和线程绑定,
一个线程拥有一个消息队列
。
难道我们只能在一个线程中定义一个THandler?,这显然是不行的,思考一下导致
无限循环
的是
消息队列
,如果想要在一个线程中创建多个THandler,那么
消息队列就不能在THandler中创建
,而是要和线程绑定,
一个线程拥有一个消息队列
。
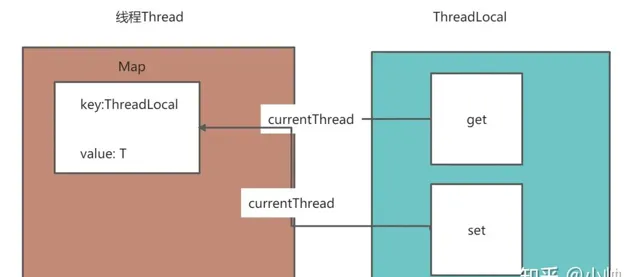
那么问题来了,如何在一个线程中保存一个对象呢?Java正好提供了一个类
ThreadLocal
,ThreadLocal提供了两个方法get和set,分别是从当前线程获取某个值,以及从当前线程中存储某个值。
 public
 void
 set
 (
 T
 value
 )
 {
 Thread
 t
 =
 Thread
 .
 currentThread
 ();
 //获取当前线程
 ThreadLocalMap
 map
 =
 getMap
 (
 t
 );
 if
 (
 map
 !=
 null
 )
 map
 .
 set
 (
 this
 ,
 value
 );
 //存储到当前线程的map集合中 key:ThreadLocal对象 value:存储的任何值
 else
 createMap
 (
 t
 ,
 value
 );
 }
 public
 T
 get
 ()
 {
 Thread
 t
 =
 Thread
 .
 currentThread
 ();
 ThreadLocalMap
 map
 =
 getMap
 (
 t
 );
 if
 (
 map
 !=
 null
 )
 {
 ThreadLocalMap
 .
 Entry
 e
 =
 map
 .
 getEntry
 (
 this
 );
 //根据ThreadLocal对象 获取存储的值。
 if
 (
 e
 !=
 null
 )
 {
 @SuppressWarnings
 (
 "unchecked"
 )
 T
 result
 =
 (
 T
 )
 e
 .
 value
 ;
 return
 result
 ;
 }
 }
 return
 setInitialValue
 ();
 }
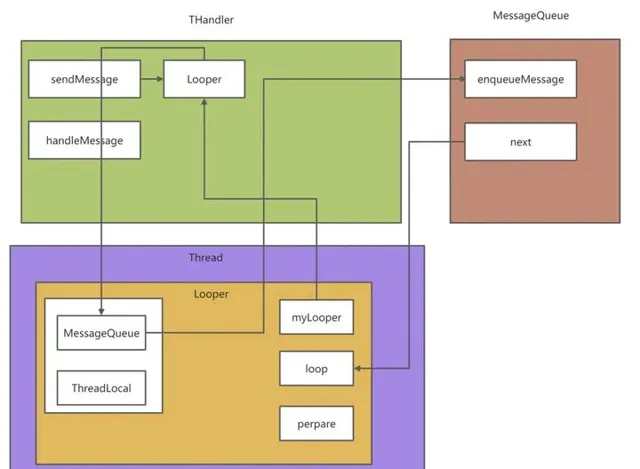
OK,找到了解决方案,下面就开始写代码了,首先要梳理一下,通过创建
Looper
类来管理当前线程和消息队列也就是
MessageQueue
,我们中需要暴露两个静态方法就可以了一个是
prepare
通过ThreadLocal来向当前的线程存储当前类的对象,另一个方法就是
loop
开启消息队列循环机制,还可以在加一个方法
myLooper
就是通过
ThreadLocal
来返回当前的
Looper
对象。 Looper类的结构图如下:
代码实现如下:
 /**
 * Looper和线程绑定一个线程只能有一个Looper,管理队列
 */
 public
 class
 Looper
 {
 public
 MessageQueue
 messageQueue
 ;
 //ThreadLocal
 private
 static
 ThreadLocal
 <
 Looper
 >
 threadLocal
 =
 new
 ThreadLocal
 <>();
 //保证Looper唯一
 public
 Looper
 ()
 {
 messageQueue
 =
 new
 MessageQueue
 ();
 }
 /**
 * Looper的生命周期是当前线程的生命周期长度
 * 通过ThreadLocal保证一个线程只有一个Looper,ThreadLocal,
 * 将Looper存储到当前线程的ThreadLocalMap,key是ThreadLocal对象
 */
 public
 static
 void
 prepare
 (){
 if
 (
 threadLocal
 .
 get
 ()!=
 null
 ){
 throw
 new
 RuntimeException
 (
 "Only one Looper my be create per thread"
 );
 }
 //当前线程 存储Looper
 threadLocal
 .
 set
 (
 new
 Looper
 ());
 }
 /**
 * 获取当前线程的Looper
 * @return
 */
 public
 static
 Looper
 myLooper
 (){
 return
 threadLocal
 .
 get
 ();
 }
 public
 static
 void
 loop
 (){
 //获取当前线程的Looper
 final
 Looper
 looper
 =
 myLooper
 ();
 MessageQueue
 messageQueue
 =
 looper
 .
 messageQueue
 ;
 for
 (;;){
 Message
 next
 =
 messageQueue
 .
 next
 ();
 // handleMessage(next); 无法在多个Handler中找到
 }
 }
 }
但是:无法在
Looper
中调用
THandler
的
handleMessage
方法,思考一下如果在一个线程中创建了多个
THandler
实例,难道要想
Looper
传递一个
THandler
实例的列表吗?这样是不现实的,那么如何解决呢?在
THandler
中有
Message
消息的引用,而
MessageQueue
存储了
Message
引用,所以我们向Message添加一个
THander target
的引用。
 public
 class
 Message
 {
 public
 String
 obj
 ;
 public
 MHandler
 target
 ;
 public
 Message
 ()
 {
 }
 public
 Message
 (
 String
 obj
 )
 {
 this
 .
 obj
 =
 obj
 ;
 }
 }
而在
THandler
中的
sendMessage
中通过
message
的实例,设置THandler的实例,然后通过
Looper.myLooper()
获取到当前线程的
Looper
实例,就可以获取到消息队列的
MessageQueue
的实例,调用
enqueueMessage(message)
方法添加到消息队列中。
 Looper
 mLooper
 ;
 public
 MHandler
 ()
 {
 mLooper
 =
 Looper
 .
 myLooper
 ();
 }
 //发送消息
 public
 void
 sendMessage
 (
 Message
 message
 ){
 enqueueMessage
 (
 message
 );
 }
 private
 void
 enqueueMessage
 (
 Message
 message
 ){
 message
 .
 target
 =
 this
 ;
 //保存当前的Handler
 //将消息添加到消息队列中去
 mLooper
 .
 messageQueue
 .
 enqueueMessage
 (
 message
 );
 }
那么就可以在
Looper
中的
loop
方法中拿到
THandler
的实例对象了,直接调用
handleMessage
就可以了
 public
 static
 void
 loop
 (){
 //获取当前线程的Looper
 final
 Looper
 looper
 =
 myLooper
 ();
 MessageQueue
 messageQueue
 =
 looper
 .
 messageQueue
 ;
 for
 (;;){
 Message
 next
 =
 messageQueue
 .
 next
 ();
 // handleMessage(next); 无法在多个Handler中找到
 next
 .
 target
 .
 handleMessage
 (
 next
 );
 }
 }
测试代码如下:
private
MHandler
handler
;
private
MHandler
handler2
;
public
void
method
()
{
//主线程向子线程发送消息
//子线程
new
Thread
(
new
Runnable
()
{
@Override
public
void
run
()
{
Looper
.
prepare
();
//创建Looper保证一个线程一个消息队列
//那么如何在子线程切换到主线程呢?
handler
=
new
MHandler
()
{
@Override
public
void
handleMessage
(
Message
message
)
{
try
{
Thread
.
sleep
(
1000
);
//处理消息阻塞
}
catch
(
InterruptedException
e
)
{
e
.
printStackTrace
();
}
System
.
out
.
println
(
Thread
.
currentThread
().
getName
()+
" message = "
+
message
.
obj
);
}
};
//支持多Handler实例
handler2
=
new
MHandler
()
{
@Override
public
void
handleMessage
(
Message
message
)
{
try
{
Thread
.
sleep
(
1000
);
//处理消息阻塞
}
catch
(
InterruptedException
e
)
{
e
.
printStackTrace
();
}
System
.
out
.
println
(
Thread
.
currentThread
().
getName
()+
" message2 = "
+
message
.
obj
);
}
};
//looper会阻塞子线程,导致后面的代码无法运行,所以需要Looper机制,一个线程只能有一个队列
Looper
.
loop
();
//无限循环,在子线程调用了handleMessage,所以handleMessage是在子线程执行的
System
.
out
.
println
(
"无法执行"
);
}
}).
start
();
try
{
Thread
.
sleep
(
1000
);
}
catch
(
InterruptedException
e
)
{
e
.
printStackTrace
();
}
System
.
out
.
println
(
"主线程:"
+
Thread
.
currentThread
().
getName
());
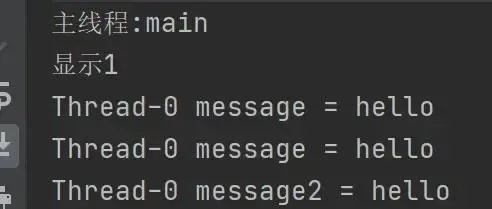
//主线程,向子线程发送消息 发送大量消息 通过阻塞队列,将消息放入队列,不会因为长时间处理消息而阻塞主线程
handler
.
sendMessage
(
new
Message
(
"hello"
));
System
.
out
.
println
(
"显示1"
);
handler
.
sendMessage
(
new
Message
(
"hello"
));
handler2
.
sendMessage
(
new
Message
(
"hello"
));
handler2
.
sendMessage
(
new
Message
(
"hello"
));
}
结果如下:消息都得到了处理。
那么整体的线程间通信框架的封装思路,如下图所示:
 上述对THandler的封装处理,其实就是Android源码中的Handler的大致思路。其实同THandler还可以看出Handler为什么会造成
内存泄漏
的问题:
上述对THandler的封装处理,其实就是Android源码中的Handler的大致思路。其实同THandler还可以看出Handler为什么会造成
内存泄漏
的问题:
内存泄漏的本质: 长生命周期持有短生命周期对象,也就是Message持有了Handler的引用而造成的。 从THandler的持有链来看: **线程 -> Looper -> MessageQueue -> Message -> THandler -> 其他/Activity **如此长的持有链,Looper和MessageQueue的生命周期和线程的生命周期一样长,这样长的生命周期持有了THandler和其他/Acitivity的短生命周期的引用,是很有可能会造成内存泄漏的。
还可以看出: Handler存在的意义在于:主线程的通信,也是App内部的通信都必须使用Handler,一个线程只有一个Looper,一个MessageQueue(消息队列),有多个Handler的实例。Android所有的主线程通信都是在Handler上运行的,因为Looper.loop()开启了一个死循环,在loop()后面的代码都无法执行,使得主线程一直在运行,而Android中的App内部通信必须使用Handler进行通信,包括启动服务、四大组件、UI绘制和更新都是在Looper.loop()的线程上进行执行的。
Message 设计
在Handler中的Message设计非常巧妙,为什么要设计Message呢?因为在App的内部都是通过Handler进行通信的,然而除了应用层的代码还有底层的其他服务事件等等都需要通过Handler传递Message进行通信,会创建大量的Message,会造成Message不停的创建和销毁,而造成内存抖动,下面来看看如何设计Message的回收与复用机制,以及通过什么的方式创建Message。在上述自己写了一个线程的通信框架THandler在设计,设计的Message特别简单:通过Object存储数据
 public
 class
 Message
 {
 public
 Object
 obj
 ;
 public
 MHandler
 target
 ;
 public
 Message
 ()
 {
 }
 public
 Message
 (
 Object
 obj
 )
 {
 this
 .
 obj
 =
 obj
 ;
 }
 }
我们指定一个线程只有一个Looper和MessageQueue,当使用THandler大量的发送消息时,会频繁的创建Message对象,使Message对象频繁的创建和销毁,从而造成 内存抖动 。
内存抖动: 短时间大量的创建和销毁对象会造成内存抖动 。 内存抖动解决方式就是复用 。而享元设计模式就是解决主要用于 减少创建对象的数量 ,以减少内存占用和提高性能。享元模式的设计思路如下: 假设要大量的生成一个类的对象:
 public
 class
 Circle
 implements
 Shape
 {
 private
 String
 color
 ;
 private
 int
 x
 ;
 private
 int
 y
 ;
 public
 String
 getColor
 ()
 {
 return
 color
 ;
 }
 public
 void
 setColor
 (
 String
 color
 )
 {
 this
 .
 color
 =
 color
 ;
 }
 public
 int
 getX
 ()
 {
 return
 x
 ;
 }
 public
 void
 setX
 (
 int
 x
 )
 {
 this
 .
 x
 =
 x
 ;
 }
 public
 int
 getY
 ()
 {
 return
 y
 ;
 }
 public
 void
 setY
 (
 int
 y
 )
 {
 this
 .
 y
 =
 y
 ;
 }
 @Override
 public
 void
 draw
 ()
 {
 System
 .
 out
 .
 println
 (
 "Circle:"
 +
 color
 +
 " x:"
 +
 x
 +
 " y:"
 +
 y
 );
 }
 }
通过HashMap记录创建过的对象,当下次在有相同的
key
则直接复用对象,注意HashMap必须是
static
.
 public
 class
 ShapeFactory
 {
 private
 static
 final
 HashMap
 <
 String
 ,
 Shape
 >
 cirMap
 =
 new
 HashMap
 ();
 public
 static
 Shape
 getCir
 (
 String
 color
 ){
 Circle
 circle
 =
 (
 Circle
 )
 cirMap
 .
 get
 (
 color
 );
 if
 (
 circle
 ==
 null
 ){
 //如果为null则创建对象
 circle
 =
 new
 Circle
 ();
 circle
 .
 setColor
 (
 color
 );
 cirMap
 .
 put
 (
 color
 ,
 circle
 );
 }
 //如果不为空则复用对象
 return
 circle
 ;
 }
 }
那么Handler中的Message是如何设计的呢?下面来进行源码的探索。
Message._obtain_()
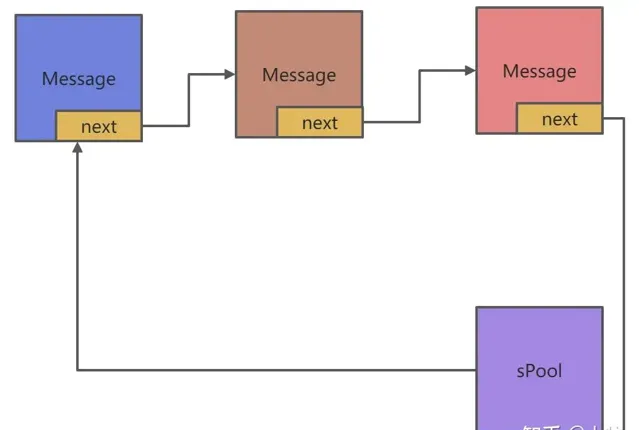
复用Message,Message采用单向链表实现了复用,可以检查是否有可以复用的
Message
,用过复用避免过多的创建、销毁
Message
对象达到优化内存和性能。
其实Message中的复用和回收机制是享元模式的一种实现,不一定要使用HashMap来存储对象。Message采用了更简单的单链表的形式对对象进行存储。
那么什么是单链表呢?其实就是在当前对象加上一个next变量,next指向下一个对象。如下代码:
Message具备了享元模式的特性, 必须通过static来存储复用对象 ,以单链表的形式代替唯一标识码进行存储复用对象链表,因为Message对象没有什么特性,不需要唯一标识码。这样Message就具备了对象的复用机制。
 Message
 next
 ;
 //典型的单链表,指向下一个对象
 private
 static
 Message
 sPool
 ;
 //在内存中保存复用的对象
 private
 static
 int
 sPoolSize
 =
 0
 ;
 //链表的大小
 private
 static
 final
 int
 MAX_POOL_SIZE
 =
 50
 ;//
 链表的最大大小
 ,
 如果超过了最大的大小则通过new创建
Message实现复用的机制,通过obtain方法:
 public
 static
 Message
 obtain
 ()
 {
 synchronized
 (
 sPoolSync
 )
 {
 //
 if
 (
 sPool
 !=
 null
 )
 {
 //首先判断 如果在内存中的static为空则直接new创建
 Message
 m
 =
 sPool
 ;
 //m 表示是当前要复用的对象
 sPool
 =
 m
 .
 next
 ;
 //将sPool 指到下一个复用对象,供下一个Message使用
 m
 .
 next
 =
 null
 ;
 //一定要断开当前的链表,因为外部要使用这个m对象
 m
 .
 flags
 =
 0
 ;
 // clear in-use flag
 sPoolSize
 --;
 //链表的大小减一
 return
 m
 ;
 }
 }
 return
 new
 Message
 ();
 }
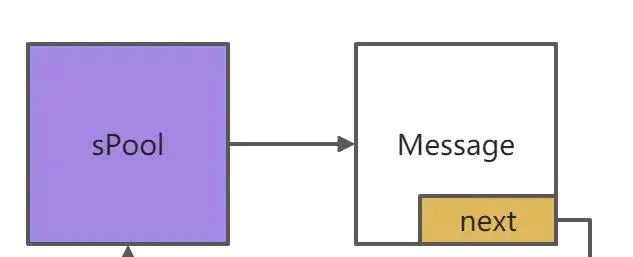
上述代码设计的非常巧妙,只看代码可能发现不了,直接上图:下图是当前某个时刻的链表结构
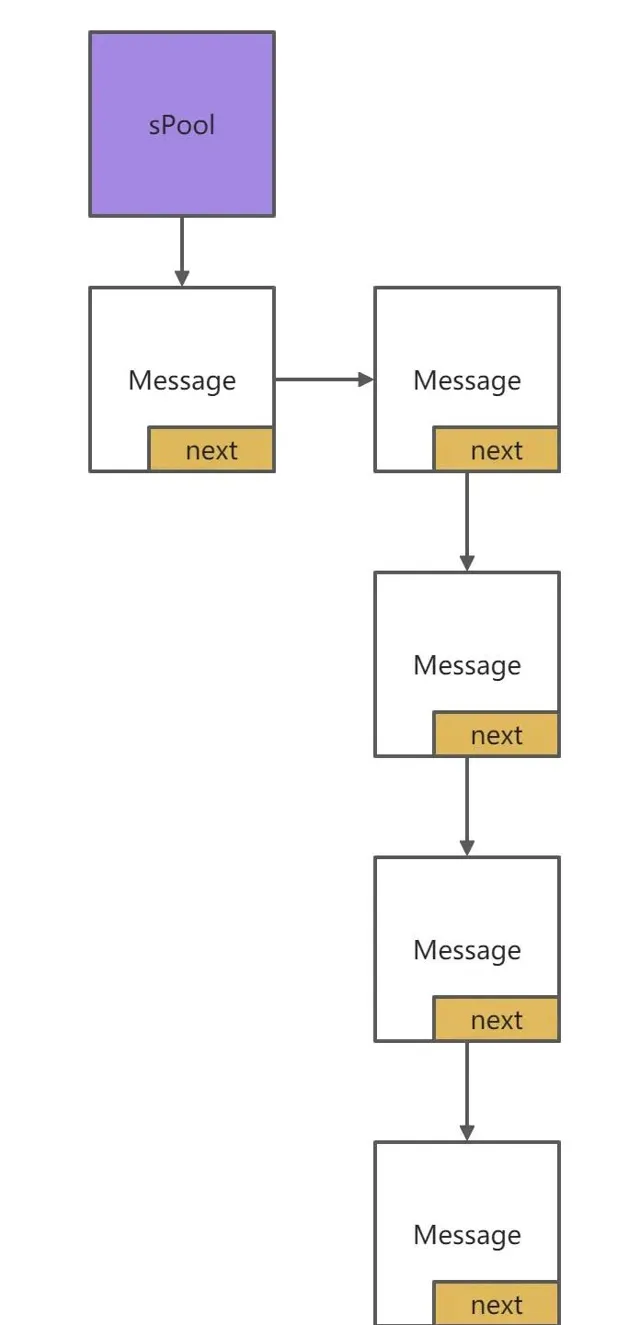
当调用obtain()方法时:将链表的头部对象返回,sPool指向下一个复用对象。
 看到这里可能存在疑问?sPool没有看到初始化的地方啊?它从哪里初始化的呢?而且对象如何复用的呢?
Message对象是在使用完毕后,存放到单链表复用池的,那么什么地方使用了Message对象呢?就是handleMessage,而调用handleMessage的地方就是Looper.loop()方法
 public
 static
 void
 loop
 ()
 {
 final
 Looper
 me
 =
 myLooper
 ();
 if
 (
 me
 ==
 null
 )
 {
 throw
 new
 RuntimeException
 (
 "No Looper; Looper.prepare() wasn't called on this thread."
 );
 }
 final
 MessageQueue
 queue
 =
 me
 .
 mQueue
 ;
 for
 (;;)
 {
 Message
 msg
 =
 queue
 .
 next
 ();
 // might block
 if
 (
 msg
 ==
 null
 )
 {
 // No message indicates that the message queue is quitting.
 return
 ;
 }
 .......
 msg
 .
 target
 .
 dispatchMessage
 (
 msg
 );
 //调用了Handler.handleMessage
 msg
 .
 recycleUnchecked
 ();
 //调用了销毁对象的方法
 }
 }
从上述代码可以看到使用完
Message
后调用了
recycleUnchecked
方法,其实就是回收对象,将对象复用存储到复用池中。
 void
 recycleUnchecked
 ()
 {
 // Mark the message as in use while it remains in the recycled object pool.
 // Clear out all other details.
 flags
 =
 FLAG_IN_USE
 ;
 what
 =
 0
 ;
 arg1
 =
 0
 ;
 arg2
 =
 0
 ;
 obj
 =
 null
 ;
 replyTo
 =
 null
 ;
 sendingUid
 =
 UID_NONE
 ;
 workSourceUid
 =
 UID_NONE
 ;
 when
 =
 0
 ;
 target
 =
 null
 ;
 callback
 =
 null
 ;
 data
 =
 null
 ;
 synchronized
 (
 sPoolSync
 )
 {
 if
 (
 sPoolSize
 <
 MAX_POOL_SIZE
 )
 {
 next
 =
 sPool
 ;
 sPool
 =
 this
 ;
 sPoolSize
 ++;
 }
 }
 }
嗖嘎,没错就在这里,
sPool
没有初始化,是因为
sPool
第一次指向了回收的
Message
对象,复用了使用完的
Message
对象,同时还判断了链表复用池的大小,如果超过了
MAX_POOL_SIZE
,就不会往复用池中添加了,防止无限添加
Message
对象,导致内存占用越来越大。
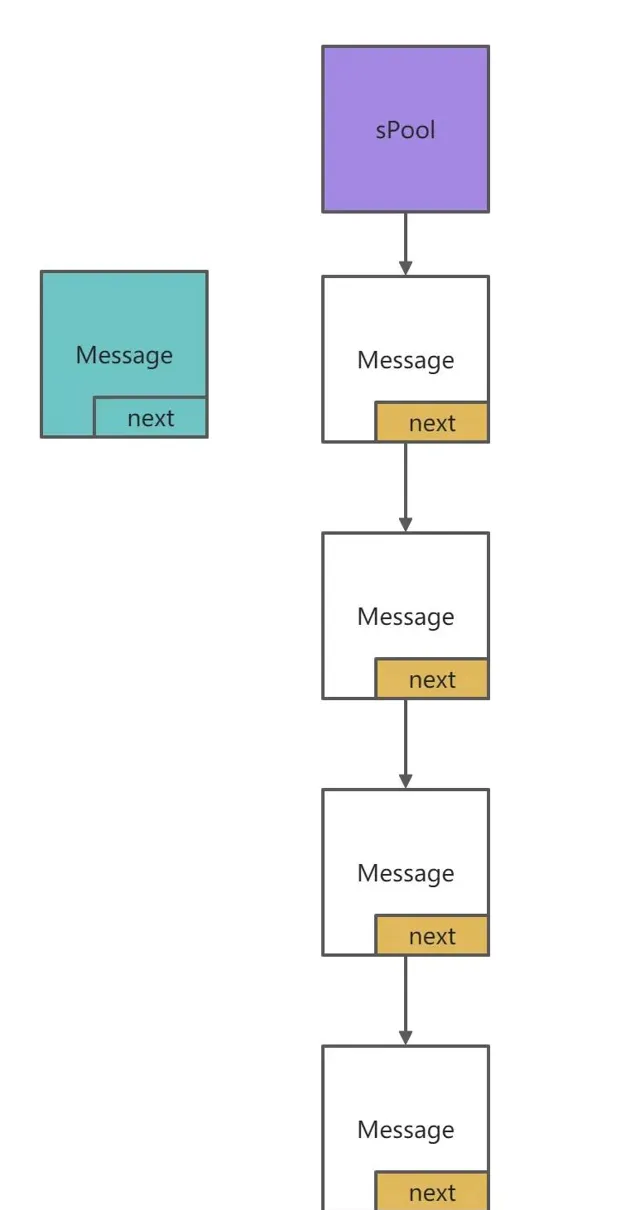
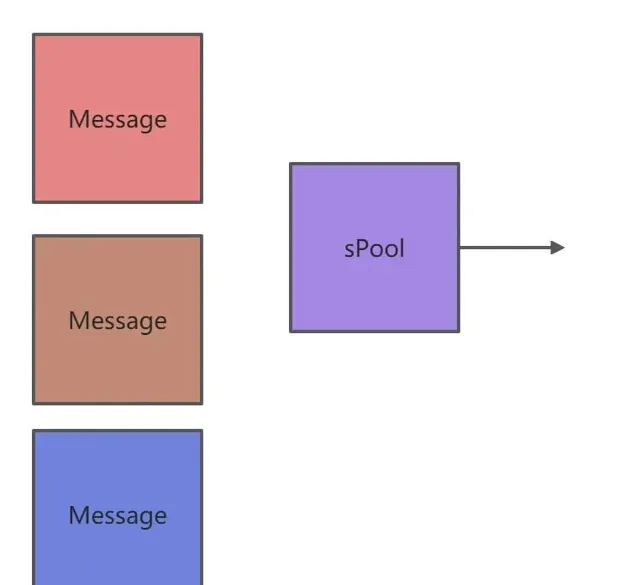
sPool 其实不用初始化,如下图就是第一次产生Message对象。
当突然一起并发来了三个obtain(),这时候复用池只有一个Message对象,其中复用池的一个对象被拿去使用,剩下的两个通过new创建了两个Message对象,返回被拿去使用,这时候复用池是空的
当第一个消息处理完毕:
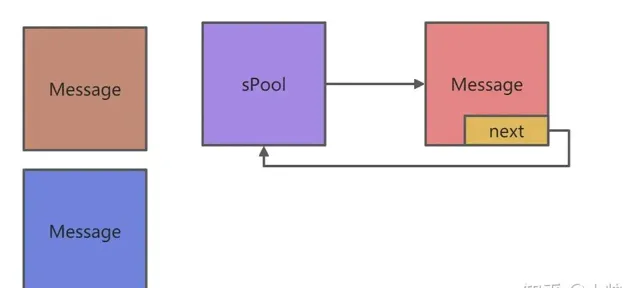
第二个消息处理完毕:
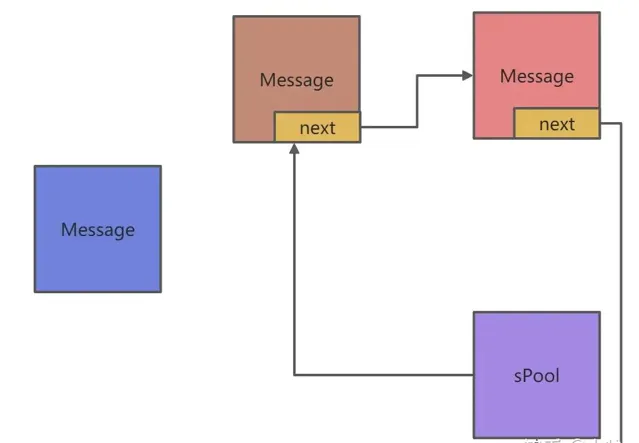
第三个消息处理完毕:
 可以看出,形成了一个单向循环链表,最后一个被回收的消息对象最先被复用。
可以得出结论: Handler中的Message,推荐使用Message.obtain()方法复用Message对象,Message类采用享元模式,通过static来使复用池存储在内存中,使用单向循环链表作为复用池 。
那我们自己写的THandler中的Message就可以优化成如下:
 public
 class
 Message
 {
 public
 String
 obj
 ;
 public
 MHandler
 target
 ;
 Message
 next
 ;
 private
 static
 Message
 sPool
 ;
 private
 static
 final
 int
 MAX_POOL
 =
 50
 ;
 private
 static
 int
 sPoolSize
 =
 0
 ;
 public
 Message
 ()
 {
 }
 public
 Message
 (
 String
 obj
 )
 {
 this
 .
 obj
 =
 obj
 ;
 }
 public
 static
 Message
 obtain
 (){
 if
 (
 sPool
 !=
 null
 ){
 Message
 m
 =
 sPool
 ;
 sPool
 =
 m
 .
 next
 ;
 m
 .
 next
 =
 null
 ;
 sPoolSize
 --;
 return
 m
 ;
 }
 return
 new
 Message
 ();
 }
 public
 static
 Message
 obtain
 (
 String
 msg
 ){
 Message
 obtain
 =
 obtain
 ();
 obtain
 .
 obj
 =
 msg
 ;
 return
 obtain
 ;
 }
 public
 void
 recycle
 (){
 if
 (
 sPoolSize
 <
 MAX_POOL
 ){
 next
 =
 sPool
 ;
 sPool
 =
 this
 ;
 sPoolSize
 ++;
 }
 }
 }
 //Looper
 public
 static
 void
 loop
 (){
 //获取当前线程的Looper
 final
 Looper
 looper
 =
 myLooper
 ();
 MessageQueue
 messageQueue
 =
 looper
 .
 messageQueue
 ;
 for
 (;;){
 Message
 next
 =
 messageQueue
 .
 next
 ();
 // handleMessage(next); 无法在多个Handler中找到
 next
 .
 target
 .
 handleMessage
 (
 next
 );
 next
 .
 recycle
 ();
 //回收Message对象
 }
 }
MessageQueue 设计
在上述自己写的THandler中的,MessageQueue消息队列,实现的非常简单,只是解决了大量消息的问题,对于按照时间发送消息和阻塞唤醒都没有实现,那么在Android 中Handler的MessageQueue是如何做到按时间排序发送消息以及阻塞和唤醒的呢?如何重新设计一下自己的MessageQueue呢?
首先,来看
MessageQueue
如何实现按时间排序消息队列的,在上述
Message
设计中,
Message
是一个单向循环链表,而
MessageQueue
正是基于单向链表进行时间排序的。
MessageQueue
中有一个
Message mMessage
的变量而这个变量就是消息队列。 在
Handler
中通过
sendMessageDelayed
,按照时间进行发送消息。在(当前时间+ delayMillis)之前的所有挂起消息之后将消息放入消息队列。
 threadHandler
 .
 sendMessageDelayed
 (
 threadHandler
 .
 obtainMessage
 (),
 1000
 );
 public
 final
 boolean
 sendMessageDelayed
 (
 @NonNull
 Message
 msg
 ,
 long
 delayMillis
 )
 {
 if
 (
 delayMillis
 <
 0
 )
 {
 delayMillis
 =
 0
 ;
 }
 // SystemClock.uptimeMillis() + delayMillis 转换从绝对的时间
 return
 sendMessageAtTime
 (
 msg
 ,
 SystemClock
 .
 uptimeMillis
 ()
 +
 delayMillis
 );
 }
将消息按时间放入消息队列正是调用了MessageQueue的
enqueueMessage
方法
when==0
或者小于链表头部的
when
那么就会将
msg
插入链表头部。 如果
when > 0
,就会遍历链表当遍历到
when < p.when
,那么
msg
就会插入到
p
的前面。其实就是链表的插入操作。
 boolean
 enqueueMessage
 (
 Message
 msg
 ,
 long
 when
 ){
 //msg 要放入消息队列的消息 when 什么时间执行这个 消息
 .......
 msg
 .
 markInUse
 ();
 msg
 .
 when
 =
 when
 ;
 Message
 p
 =
 mMessages
 ;
 if
 (
 p
 ==
 null
 ||
 when
 ==
 0
 ||
 when
 <
 p
 .
 when
 )
 {
 msg
 .
 next
 =
 p
 ;
 mMessages
 =
 msg
 ;
 }
 else
 {
 Message
 prev
 ;
 for
 (;;)
 {
 prev
 =
 p
 ;
 p
 =
 p
 .
 next
 ;
 if
 (
 p
 ==
 null
 ||
 when
 <
 p
 .
 when
 )
 {
 break
 ;
 }
 if
 (
 needWake
 &&
 p
 .
 isAsynchronous
 ())
 {
 needWake
 =
 false
 ;
 }
 }
 msg
 .
 next
 =
 p
 ;
 // invariant: p == prev.next
 prev
 .
 next
 =
 msg
 ;
 }
 ........
 }
如下图所示:
- 当when==0或者when<p.when msg插入链表头部
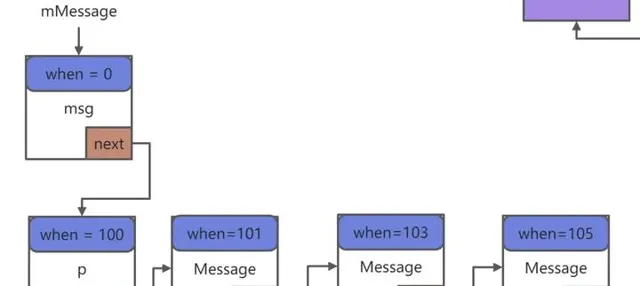
- 当when > p.when 时就会遍历链表
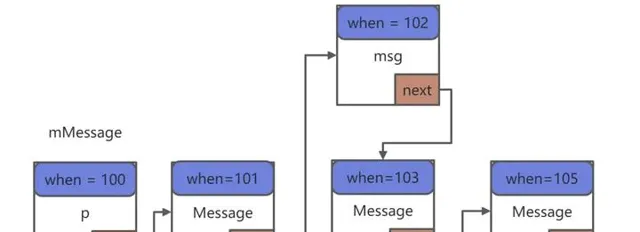 那么总结一下:一个线程对应着一个Looper,一个Looper对应着一个MessageQueue,而一个MessageQueue对应一个Message单向链表作为消息队列和时间排序。这样整体的设计清晰明了了。
Message 基于单链表的实现,正是方便了对时间的排序,MessageQueue消息队列对时间排序实现很简单,那么MessageQueue是如何当时间没有到如何实现 消息阻塞和唤醒 呢?单向链表无法实现阻塞
其实阻塞和唤醒通过底层内核层的代码epoll 机制来实现的。 消息阻塞的Java层实现,其实就是通过JNI调用底层的
nativePollOnce
方法使其进入阻塞状态。
 //出队阻塞的逻辑
 Message
 next
 ()
 {
 final
 long
 ptr
 =
 mPtr
 ;
 if
 (
 ptr
 ==
 0
 )
 {
 return
 null
 ;
 }
 int
 pendingIdleHandlerCount
 =
 -
 1
 ;
 // -1 only during first iteration
 int
 nextPollTimeoutMillis
 =
 0
 ;
 for
 (;;)
 {
 if
 (
 nextPollTimeoutMillis
 !=
 0
 )
 {
 Binder
 .
 flushPendingCommands
 ();
 }
 //下一次进入 阻塞调用Native的方法
 nativePollOnce
 (
 ptr
 ,
 nextPollTimeoutMillis
 );
 synchronized
 (
 this
 )
 {
 //.....
 if
 (
 msg
 !=
 null
 )
 {
 if
 (
 now
 <
 msg
 .
 when
 )
 {
 // 阻塞的时间
 nextPollTimeoutMillis
 =
 (
 int
 )
 Math
 .
 min
 (
 msg
 .
 when
 -
 now
 ,
 Integer
 .
 MAX_VALUE
 );
 }
 else
 {
 ///
 return
 msg
 ;
 }
 }
 else
 {
 // No more messages. 如果没有消息-1表示一直阻塞
 nextPollTimeoutMillis
 =
 -
 1
 ;
 }
 .....
 if
 (
 pendingIdleHandlerCount
 <=
 0
 )
 {
 // 如果没有返回msg则说明要进入阻塞状态,将mBlocked设置为true,当有新的消息来时就会
 //根据mBlocked==true 唤醒
 mBlocked
 =
 true
 ;
 continue
 ;
 }
 }
 .....
 }
 }
唤醒机制:通过JNI调用
nativeWake
进入唤醒状态
 //入队唤醒的逻辑
 boolean
 enqueueMessage
 (
 Message
 msg
 ,
 long
 when
 )
 {
 ....
 synchronized
 (
 this
 )
 {
 if
 (
 p
 ==
 null
 ||
 when
 ==
 0
 ||
 when
 <
 p
 .
 when
 )
 {
 // New head, wake up the event queue if blocked.
 msg
 .
 next
 =
 p
 ;
 mMessages
 =
 msg
 ;
 needWake
 =
 mBlocked
 ;
 //mBlocked 决定了是否要唤醒消息
 }
 else
 {
 needWake
 =
 mBlocked
 &&
 p
 .
 target
 ==
 null
 &&
 msg
 .
 isAsynchronous
 ();
 Message
 prev
 ;
 for
 (;;)
 {
 prev
 =
 p
 ;
 p
 =
 p
 .
 next
 ;
 if
 (
 p
 ==
 null
 ||
 when
 <
 p
 .
 when
 )
 {
 break
 ;
 }
 if
 (
 needWake
 &&
 p
 .
 isAsynchronous
 ())
 {
 needWake
 =
 false
 ;
 }
 }
 msg
 .
 next
 =
 p
 ;
 // invariant: p == prev.next
 prev
 .
 next
 =
 msg
 ;
 }
 // We can assume mPtr != 0 because mQuitting is false.
 // 唤醒next阻塞,执行消息 唤醒
 if
 (
 needWake
 )
 {
 nativeWake
 (
 mPtr
 );
 }
 }
 return
 true
 ;
 }
Loop 消息循环机制
在上述探索线程的通信机制中,发现在Looper类中的loop()方法是一个死循环,那么按照正常逻辑会阻塞主线程,如下代码:假设我们在主线程中开启了loop使用自己写的THandler他是不会执行loop后面的代码的, 在Android中主线程也就是UI线程,为什么不会阻塞UI线程呢 ?
 private
 THandler
 tHandler2
 ;
 public
 void
 method2
 (){
 tHandler2
 =
 new
 THandler
 (){
 @Override
 public
 void
 handleMessage
 (
 Message
 message
 )
 {
 super
 .
 handleMessage
 (
 message
 );
 System
 .
 out
 .
 println
 (
 "主线程处理消息 message = "
 +
 message
 .
 obj
 );
 }
 };
 Thread
 thread
 =
 new
 Thread
 (
 new
 Runnable
 ()
 {
 @Override
 public
 void
 run
 ()
 {
 tHandler2
 .
 sendMessage
 (
 new
 Message
 (
 "我是子线程发送的消息"
 ));
 }
 });
 thread
 .
 start
 ();
 tHandler2
 .
 loop
 ();
 //开启消息循环机制
 System
 .
 out
 .
 println
 (
 "loop后面的代码无法执行,因为loop是一个无限循环"
 );
 }
在Android的App中通过ActivityThread中的main函数中的代码:
 public
 static
 void
 main
 (
 String
 []
 args
 )
 {
 ......
 Looper
 .
 prepareMainLooper
 ();
 ......
 Looper
 .
 loop
 ();
 //死循环 主线程一直会存在
 //如果继续执行抛出异常 主线程都没了 那么整个app就会杀死
 throw
 new
 RuntimeException
 (
 "Main thread loop unexpectedly exited"
 );
 }
在Android中的所有的 主线程操作 都是通过 Handler 来执行这些操作的, 以事件为驱动的操作系统 。
Looper通过
阻塞+任务执行来实现更新UI
,当没有任务时进入
阻塞状态
,当任务来时就会添加到消息队列,
loop()死循环
查到有新的消息就会
唤醒
执行任务,阻塞可以让出CPU资源,阻塞和唤醒机制通过了MessageQueue的next方法进行了实现,不会让主线程导致卡死。
 static
 final
 ThreadLocal
 <
 Looper
 >
 sThreadLocal
 =
 new
 ThreadLocal
 <
 Looper
 >();
 //在ActivityThread中就是调用了这个方法
 public
 static
 void
 prepareMainLooper
 ()
 {
 prepare
 (
 false
 );
 //消息队列不可以quit
 synchronized
 (
 Looper
 .
 class
 )
 {
 if
 (
 sMainLooper
 !=
 null
 )
 {
 throw
 new
 IllegalStateException
 (
 "The main Looper has already been prepared."
 );
 }
 sMainLooper
 =
 myLooper
 ();
 }
 }
 //创建MessageQueue 获取当前的线程与线程绑定
 private
 Looper
 (
 boolean
 quitAllowed
 )
 {
 mQueue
 =
 new
 MessageQueue
 (
 quitAllowed
 );
 mThread
 =
 Thread
 .
 currentThread
 ();
 }
 public
 static
 void
 prepare
 ()
 {
 //消息队列可以quit
 prepare
 (
 true
 );
 }
 private
 static
 void
 prepare
 (
 boolean
 quitAllowed
 )
 {
 if
 (
 sThreadLocal
 .
 get
 ()
 !=
 null
 )
 {
 //每个线程只能创建一个Looper
 throw
 new
 RuntimeException
 (
 "Only one Looper may be created per thread"
 );
 }
 //将Looper加入到当前的线程中
 sThreadLocal
 .
 set
 (
 new
 Looper
 (
 quitAllowed
 ));
 }
在上述代码中prepare有两个重载方法,quitAllowed表示的MessageQueue的消息队列是否可以销毁。 MessageQueue的构造方法如下:mQuitAllowed决定队列是否可以销毁,主线程的队列不可以被销毁需要传入false,在MessageQueue的quit方法
 MessageQueue
 (
 boolean
 quitAllowed
 )
 {
 mQuitAllowed
 =
 quitAllowed
 ;
 mPtr
 =
 nativeInit
 ();
 }
 void
 quit
 (
 boolean
 safe
 )
 {
 if
 (!
 mQuitAllowed
 )
 {
 throw
 new
 IllegalStateException
 (
 "Main thread not allowed to quit."
 );
 }
 synchronized
 (
 this
 )
 {
 if
 (
 mQuitting
 )
 {
 return
 ;
 }
 mQuitting
 =
 true
 ;
 if
 (
 safe
 )
 {
 removeAllFutureMessagesLocked
 ();
 }
 else
 {
 removeAllMessagesLocked
 ();
 }
 // We can assume mPtr != 0 because mQuitting was previously false.
 nativeWake
 (
 mPtr
 );
 }
 }
ThreadLocal 干什么的?
线程上下文的存储变量,线程隔离的工具类,
 public
 void
 set
 (
 T
 value
 )
 {
 Thread
 t
 =
 Thread
 .
 currentThread
 ();
 //获取当前线程的ThreadLocalMap
 ThreadLocalMap
 map
 =
 getMap
 (
 t
 );
 if
 (
 map
 !=
 null
 )
 map
 .
 set
 (
 this
 ,
 value
 );
 //当前线程存储信息
 else
 createMap
 (
 t
 ,
 value
 );
 }
一个线程只有一个Looper,因为一个Thread线程只有一个
ThreadLocalMap<this,value>
,
this
存储的是唯一的
ThreadLocal
,所以value也是唯一的。 :::tips 一个线程只有一个唯一的Looper.Looper.ThreadLocal在整个APP的是唯一的,因为他是static final. :::
:::tips 在Looper中,一个Looper只有一个MQ. :::
 final
 MessageQueue
 mQueue
 ;
那么Handler的
MessageQueue
来自哪里呢?如下代码来自Looper的
mQueue
,所以Looper的
mQueue
是共享在Handler的
 public
 Handler
 (
 Callback
 callback
 ,
 boolean
 async
 )
 {
 ......
 mLooper
 =
 Looper
 .
 myLooper
 ();
 //调用了sThreadLocal.get()获得刚才创建的Looper对象
 //如果Looper为空则抛出异常
 if
 (
 mLooper
 ==
 null
 )
 {
 throw
 new
 RuntimeException
 (
 "Can't create handler inside thread "
 +
 Thread
 .
 currentThread
 ()
 +
 " that has not called Looper.prepare()"
 );
 }
 mQueue
 =
 mLooper
 .
 mQueue
 ;
 mCallback
 =
 callback
 ;
 mAsynchronous
 =
 async
 ;
 }
 private
 boolean
 enqueueMessage
 (
 MessageQueue
 queue
 ,
 Message
 msg
 ,
 long
 uptimeMillis
 )
 {
 msg
 .
 target
 =
 this
 ;
 //Message会持久Handler而Handler持有了Activity.
 if
 (
 mAsynchronous
 )
 {
 msg
 .
 setAsynchronous
 (
 true
 );
 }
 return
 queue
 .
 enqueueMessage
 (
 msg
 ,
 uptimeMillis
 );
 }
 //MessageQueue
 void
 quit
 (
 boolean
 safe
 )
 {
 .....
 synchronized
 (
 this
 )
 {
 if
 (
 mQuitting
 )
 {
 return
 ;
 }
 mQuitting
 =
 true
 ;
 if
 (
 safe
 )
 {
 removeAllFutureMessagesLocked
 ();
 }
 else
 {
 removeAllMessagesLocked
 ();
 }
 // We can assume mPtr != 0 because mQuitting was previously false.
 nativeWake
 (
 mPtr
 );
 }
 }
 //Looper
 public
 void
 quit
 ()
 {
 mQueue
 .
 quit
 (
 false
 );
 }
MessageQueue 可以无限制的存放Message,因为系统需要调用如果入队阻塞那么系统功能就无法使用了。出队如果MessageQueue为空就会一直阻塞。线程会阻塞,CPU可以降低CPU的调用该线程,提高CPU的性能。 这也是为甚Looper死循环不会导致应用卡死,因为Looper死循环,当从消息队列中获取next没有消息的时候就会一直阻塞,当有消息入队的时候就会唤醒。
卡死是发生了 ANR,而ANR 是一定的时间内,消息没有处理完,又用Handler发送一个ANR提醒。ANR和阻塞是没有关系的。 而Looper死循环,没有消息处理时就会block(阻塞) 不过是线程没事做了。而ANR 其实也是通过Handler发送了一个消息提醒。如下代码:
 //出队阻塞的逻辑
 Message
 next
 ()
 {
 final
 long
 ptr
 =
 mPtr
 ;
 if
 (
 ptr
 ==
 0
 )
 {
 return
 null
 ;
 }
 int
 pendingIdleHandlerCount
 =
 -
 1
 ;
 // -1 only during first iteration
 int
 nextPollTimeoutMillis
 =
 0
 ;
 for
 (;;)
 {
 if
 (
 nextPollTimeoutMillis
 !=
 0
 )
 {
 Binder
 .
 flushPendingCommands
 ();
 }
 //阻塞调用Native的方法
 nativePollOnce
 (
 ptr
 ,
 nextPollTimeoutMillis
 );
 synchronized
 (
 this
 )
 {
 //.....
 if
 (
 msg
 !=
 null
 )
 {
 if
 (
 now
 <
 msg
 .
 when
 )
 {
 // 阻塞的时间
 nextPollTimeoutMillis
 =
 (
 int
 )
 Math
 .
 min
 (
 msg
 .
 when
 -
 now
 ,
 Integer
 .
 MAX_VALUE
 );
 }
 else
 {
 ///
 }
 }
 else
 {
 // No more messages. 如果没有消息-1表示一直阻塞
 nextPollTimeoutMillis
 =
 -
 1
 ;
 }
 .....
 }
 .....
 }
 }
 //入队唤醒的逻辑
 boolean
 enqueueMessage
 (
 Message
 msg
 ,
 long
 when
 )
 {
 ....
 synchronized
 (
 this
 )
 {
 if
 (
 p
 ==
 null
 ||
 when
 ==
 0
 ||
 when
 <
 p
 .
 when
 )
 {
 // New head, wake up the event queue if blocked.
 msg
 .
 next
 =
 p
 ;
 mMessages
 =
 msg
 ;
 needWake
 =
 mBlocked
 ;
 }
 else
 {
 needWake
 =
 mBlocked
 &&
 p
 .
 target
 ==
 null
 &&
 msg
 .
 isAsynchronous
 ();
 Message
 prev
 ;
 for
 (;;)
 {
 prev
 =
 p
 ;
 p
 =
 p
 .
 next
 ;
 if
 (
 p
 ==
 null
 ||
 when
 <
 p
 .
 when
 )
 {
 break
 ;
 }
 if
 (
 needWake
 &&
 p
 .
 isAsynchronous
 ())
 {
 needWake
 =
 false
 ;
 }
 }
 msg
 .
 next
 =
 p
 ;
 // invariant: p == prev.next
 prev
 .
 next
 =
 msg
 ;
 }
 // We can assume mPtr != 0 because mQuitting is false.
 // 唤醒next阻塞,执行消息 唤醒
 if
 (
 needWake
 )
 {
 nativeWake
 (
 mPtr
 );
 }
 }
 return
 true
 ;
 }
因为子线程不会向主线程一直运行,当子线程销毁时,一定要将Looper的循环结束掉,下面我们看看是如何处理的:
 //Looper
 public
 void
 quit
 ()
 {
 mQueue
 .
 quit
 (
 false
 );
 }
 //MessageQueue 将mQuitting设置ture并且唤醒阻塞执行next
 void
 quit
 (
 boolean
 safe
 )
 {
 if
 (!
 mQuitAllowed
 )
 {
 throw
 new
 IllegalStateException
 (
 "Main thread not allowed to quit."
 );
 }
 synchronized
 (
 this
 )
 {
 if
 (
 mQuitting
 )
 {
 return
 ;
 }
 mQuitting
 =
 true
 ;
 if
 (
 safe
 )
 {
 removeAllFutureMessagesLocked
 ();
 }
 else
 {
 removeAllMessagesLocked
 ();
 }
 // We can assume mPtr != 0 because mQuitting was previously false.
 nativeWake
 (
 mPtr
 );
 }
 }
 Message
 next
 ()
 {
 final
 long
 ptr
 =
 mPtr
 ;
 if
 (
 ptr
 ==
 0
 )
 {
 return
 null
 ;
 }
 int
 pendingIdleHandlerCount
 =
 -
 1
 ;
 // -1 only during first iteration
 int
 nextPollTimeoutMillis
 =
 0
 ;
 for
 (;;)
 {
 if
 (
 nextPollTimeoutMillis
 !=
 0
 )
 {
 Binder
 .
 flushPendingCommands
 ();
 }
 //阻塞调用Native的方法
 nativePollOnce
 (
 ptr
 ,
 nextPollTimeoutMillis
 );
 synchronized
 (
 this
 )
 {
 //.....
 if
 (
 msg
 !=
 null
 )
 {
 if
 (
 now
 <
 msg
 .
 when
 )
 {
 // 阻塞的时间
 nextPollTimeoutMillis
 =
 (
 int
 )
 Math
 .
 min
 (
 msg
 .
 when
 -
 now
 ,
 Integer
 .
 MAX_VALUE
 );
 }
 else
 {
 ///
 }
 }
 else
 {
 // No more messages. 如果没有消息-1表示一直阻塞
 nextPollTimeoutMillis
 =
 -
 1
 ;
 }
 // Process the quit message now that all pending messages have been handled.
 //如果mQuitting=true返回null,这个null是关键
 if
 (
 mQuitting
 )
 {
 dispose
 ();
 return
 null
 ;
 }
 .....
 }
 .....
 }
 }
上述代码在执行Looper.quit()方法后,最终返回了null,那么在
loop()
方法中的处理,如下代码直接return并且结束掉了无限循环。
 public
 static
 void
 loop
 ()
 {
 ....
 for
 (;;)
 {
 Message
 msg
 =
 queue
 .
 next
 ();
 // might block
 if
 (
 msg
 ==
 null
 )
 {
 // No message indicates that the message queue is quitting.
 return
 ;
 }
 }
 }
线程同步
Handler是用于线程间通信,整个APP都是用它来进行线程间的协调。 主要有几个关键点:消息入库(enqueueMessage)2. 消息出库(next)3. quit销毁消息队列
quit()
都会加上
synchronized
锁,另外主线程不能
quit()
,会抛出异常
 //MessageQueue. class
 boolean
 enqueueMessage
 (
 Message
 msg
 ,
 long
 when
 )
 {
 if
 (
 msg
 .
 target
 ==
 null
 )
 {
 throw
 new
 IllegalArgumentException
 (
 "Message must have a target."
 );
 }
 if
 (
 msg
 .
 isInUse
 ())
 {
 throw
 new
 IllegalStateException
 (
 msg
 +
 " This message is already in use."
 );
 }
 //上锁,如果发现有线程正在入队列,其他线程要想入队列需要等待
 synchronized
 (
 this
 )
 {
 if
 (
 mQuitting
 )
 {
 IllegalStateException
 e
 =
 new
 IllegalStateException
 (
 msg
 .
 target
 +
 " sending message to a Handler on a dead thread"
 );
 Log
 .
 w
 (
 TAG
 ,
 e
 .
 getMessage
 (),
 e
 );
 msg
 .
 recycle
 ();
 return
 false
 ;
 }
 msg
 .
 markInUse
 ();
 msg
 .
 when
 =
 when
 ;
 Message
 p
 =
 mMessages
 ;
 boolean
 needWake
 ;
 if
 (
 p
 ==
 null
 ||
 when
 ==
 0
 ||
 when
 <
 p
 .
 when
 )
 {
 // New head, wake up the event queue if blocked.
 msg
 .
 next
 =
 p
 ;
 mMessages
 =
 msg
 ;
 needWake
 =
 mBlocked
 ;
 }
 else
 {
 // Inserted within the middle of the queue. Usually we don't have to wake
 // up the event queue unless there is a barrier at the head of the queue
 // and the message is the earliest asynchronous message in the queue.
 needWake
 =
 mBlocked
 &&
 p
 .
 target
 ==
 null
 &&
 msg
 .
 isAsynchronous
 ();
 Message
 prev
 ;
 for
 (;;)
 {
 prev
 =
 p
 ;
 p
 =
 p
 .
 next
 ;
 if
 (
 p
 ==
 null
 ||
 when
 <
 p
 .
 when
 )
 {
 break
 ;
 }
 if
 (
 needWake
 &&
 p
 .
 isAsynchronous
 ())
 {
 needWake
 =
 false
 ;
 }
 }
 msg
 .
 next
 =
 p
 ;
 // invariant: p == prev.next
 prev
 .
 next
 =
 msg
 ;
 }
 // We can assume mPtr != 0 because mQuitting is false.
 if
 (
 needWake
 )
 {
 nativeWake
 (
 mPtr
 );
 }
 }
 return
 true
 ;
 }
synchronized
锁是一个内置锁,说明对所有调用同一个MessageQueue对象的线程来说,他们都是互斥的,在Handler里一个线程对应着一个唯一的Looper对象,而Looper中有只有一个唯一的MessageQueue.所以主线程只有一个MessageQueue对象,也就是说当子线程向主线程发送消息的时候,主线程一次只会处理一个消息,并发的情况下其他线程都需要等待,这样消息队列就不会出现混乱。
再看next函数: 有个疑问,入队列的时候加锁就可以了,为什么出队列还要加锁呢?next加锁主要是可以保证next和enqueueMessage方法能够实现互斥,当一个线程调用对消息队列入队操作,那么next时候主线程中的Looper调用的,必须要等到当前的线程入队完毕,那么Looper才能做出队操作。这样才能够真正的保证多线程访问MessageQueue时有序进行的
 Message
 next
 ()
 {
 //....
 for
 (;;)
 {
 //.... 上锁
 synchronized
 (
 this
 )
 {
 }
 //....
 }
 }
消息机制之同步屏障
在上述的学习中,线程的消息都是放在同一个MessageQueue里面,取消息的时候互斥取消息,而且只能从头部取消息,而添加消息是按照消息的执行先后顺序进行的排序,那么同一个时间范围内的消息,如果它是需要立刻执行的,需要怎么办?常规方法需要等到队列轮询到自己的时候才能执行,所以需要给一个紧急需要执行的消息是一个绿色通道,这个绿色通道就是同步屏障。 例如:救护车前面后20辆车,如果一辆一辆的走,肯定不行,所以救火车要优先通过立刻执行。 msg.taget = null(标记为同步屏障)-> msg1 -> msg2 -> msg3() -> msg4同步屏障:就是阻碍同步消息,只让异步消息通过。 开启同步屏障:
 //MessageQueue. class
 public
 int
 postSyncBarrier
 ()
 {
 return
 postSyncBarrier
 (
 SystemClock
 .
 uptimeMillis
 ());
 }
 private
 int
 postSyncBarrier
 (
 long
 when
 )
 {
 // Enqueue a new sync barrier token.
 // We don't need to wake the queue because the purpose of a barrier is to stall it.
 synchronized
 (
 this
 )
 {
 final
 int
 token
 =
 mNextBarrierToken
 ++;
 //从消息池获取Message
 final
 Message
 msg
 =
 Message
 .
 obtain
 ();
 msg
 .
 markInUse
 ();
 //就是这里 初始化Message对象的时候,并没给target赋值,因此target==null
 msg
 .
 when
 =
 when
 ;
 msg
 .
 arg1
 =
 token
 ;
 Message
 prev
 =
 null
 ;
 Message
 p
 =
 mMessages
 ;
 if
 (
 when
 !=
 0
 )
 {
 while
 (
 p
 !=
 null
 &&
 p
 .
 when
 <=
 when
 )
 {
 //如果开启同步屏障的时间T不为0,且当前的同步消息里有时间小于T,则prev也不为null
 prev
 =
 p
 ;
 p
 =
 p
 .
 next
 ;
 }
 }
 //根据prev是不是null,将msg按照时间顺序插入到消息队列的合适位置
 if
 (
 prev
 !=
 null
 )
 {
 // invariant: p == prev.next
 msg
 .
 next
 =
 p
 ;
 prev
 .
 next
 =
 msg
 ;
 }
 else
 {
 msg
 .
 next
 =
 p
 ;
 mMessages
 =
 msg
 ;
 }
 return
 token
 ;
 }
 }
 //Message.java
 //如果是异步消息 需要对消息对象设置为 true
 public
 void
 setAsynchronous
 (
 boolean
 async
 )
 {
 if
 (
 async
 )
 {
 flags
 |=
 FLAG_ASYNCHRONOUS
 ;
 }
 else
 {
 flags
 &=
 ~
 FLAG_ASYNCHRONOUS
 ;
 }
 }
从上述代码,可以看出将一条Message对象并且target=null的消息插入到消息队列中了,那么异步消息如何处理呢?从分析上述的Looper的代码中可以看出调用
MessageQueue.next
处理消息,我们再来看next
 Message
 next
 ()
 {
 //......
 int
 pendingIdleHandlerCount
 =
 -
 1
 ;
 // -1 only during first iteration
 //nextPollTimeoutMillis == -1 一直阻塞
 //nextPollTimeoutMillis == 0 不会阻塞立即返回
 //nextPollTimeoutMillis > 0 最长阻塞nextPollTimeoutMillis毫秒
 //如果期间有程序唤醒会立即执行
 int
 nextPollTimeoutMillis
 =
 0
 ;
 //next也是一个无线循环
 for
 (;;)
 {
 if
 (
 nextPollTimeoutMillis
 !=
 0
 )
 {
 Binder
 .
 flushPendingCommands
 ();
 }
 nativePollOnce
 (
 ptr
 ,
 nextPollTimeoutMillis
 );
 synchronized
 (
 this
 )
 {
 // 获取系统开启到现在时间
 final
 long
 now
 =
 SystemClock
 .
 uptimeMillis
 ();
 Message
 prevMsg
 =
 null
 ;
 Message
 msg
 =
 mMessages
 ;
 //当前链表的头结点
 //注意这是关键,如果msg!=null 并且 msg.target ==null 他就是屏障,需要循环遍历,一直往后找到第一个异步消息
 if
 (
 msg
 !=
 null
 &&
 msg
 .
 target
 ==
 null
 )
 {
 // Stalled by a barrier. Find the next asynchronous message in the queue.
 do
 {
 prevMsg
 =
 msg
 ;
 msg
 =
 msg
 .
 next
 ;
 //isAsynchronous() 表示是否是异步消息 如果是异步消息立即执行
 }
 while
 (
 msg
 !=
 null
 &&
 !
 msg
 .
 isAsynchronous
 ());
 }
 if
 (
 msg
 !=
 null
 )
 {
 //如果有消息需要处理,先判断时候有没有到,如果没到的话设置一下阻塞时间
 //如有些场景常用的postDelay
 if
 (
 now
 <
 msg
 .
 when
 )
 {
 //计算出离执行时间还有多久赋值给nextPollTimeoutMillis
 //表示nativePollOnce方法要等待nextPollTimeoutMillis时长后返回
 nextPollTimeoutMillis
 =
 (
 int
 )
 Math
 .
 min
 (
 msg
 .
 when
 -
 now
 ,
 Integer
 .
 MAX_VALUE
 );
 }
 else
 {
 //获取消息
 mBlocked
 =
 false
 ;
 //链表操作,获取msg并且删除该节点
 if
 (
 prevMsg
 !=
 null
 )
 {
 prevMsg
 .
 next
 =
 msg
 .
 next
 ;
 }
 else
 {
 mMessages
 =
 msg
 .
 next
 ;
 }
 msg
 .
 next
 =
 null
 ;
 if
 (
 DEBUG
 )
 Log
 .
 v
 (
 TAG
 ,
 "Returning message: "
 +
 msg
 );
 msg
 .
 markInUse
 ();
 //返回拿到的消息
 return
 msg
 ;
 }
 }
 else
 {
 // 没有消息nextPollTimeoutMillis = -1 阻塞等待唤醒
 nextPollTimeoutMillis
 =
 -
 1
 ;
 }
 //..........
 }
 }
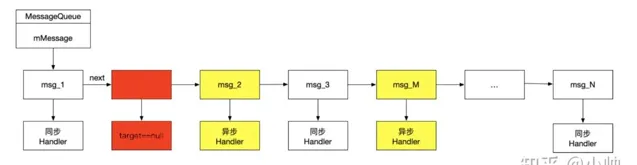
从上面的代码可以看出,开启同步屏障的时候,消息机制在处理消息的时候,优先处理异步消息。这样同步屏障就起到了一种过滤和优先级的作用。
如上图所示,在msg_1后面有一道墙就是同步屏障(红色部分)。 我们来分析一下next循环的处理方式: 当next循环到同步屏障的时候,就会循环查找该节点后面的异步消息,如果发现异步消息:
msg_2
结束循环,将msg_2处理。然后next在进行一次循环,有发现了同步屏障,然后循环查找异步消息:
msg_M
msg_M处理。这样就保证了先处理异步消息
msg_2
和
msg_M
其他的消息不会处理。那么同步消息什么时候被处理呢?首先需要移除这个同步屏障,调用
removeSyncBarrier
.
在日常的应用开发中,其实很少会用到同步屏障,同步屏障在系统的源码中会经常使用,例如
UI更新消息即为异步消息
,需要优先处理。 比如:view更新:
draw
requestLayout
invalidata
等很多地方调用 例如在
ViewRootImpl.scheduleTraversals()
:
 void
 scheduleTraversals
 ()
 {
 if
 (!
 mTraversalScheduled
 )
 {
 mTraversalScheduled
 =
 true
 ;
 //开启同步屏障
 mTraversalBarrier
 =
 mHandler
 .
 getLooper
 ().
 getQueue
 ().
 postSyncBarrier
 ();
 //发送异步消息
 mChoreographer
 .
 postCallback
 (
 Choreographer
 .
 CALLBACK_TRAVERSAL
 ,
 mTraversalRunnable
 ,
 null
 );
 if
 (!
 mUnbufferedInputDispatch
 )
 {
 scheduleConsumeBatchedInput
 ();
 }
 notifyRendererOfFramePending
 ();
 pokeDrawLockIfNeeded
 ();
 }
 }
 //...postCallback最终走到了 Choreographer.java
 private
 void
 postCallbackDelayedInternal
 (
 int
 callbackType
 ,
 Object
 action
 ,
 Object
 token
 ,
 long
 delayMillis
 )
 {
 if
 (
 DEBUG_FRAMES
 )
 {
 Log
 .
 d
 (
 TAG
 ,
 "PostCallback: type="
 +
 callbackType
 +
 ", action="
 +
 action
 +
 ", token="
 +
 token
 +
 ", delayMillis="
 +
 delayMillis
 );
 }
 synchronized
 (
 mLock
 )
 {
 final
 long
 now
 =
 SystemClock
 .
 uptimeMillis
 ();
 final
 long
 dueTime
 =
 now
 +
 delayMillis
 ;
 mCallbackQueues
 [
 callbackType
 ].
 addCallbackLocked
 (
 dueTime
 ,
 action
 ,
 token
 );
 if
 (
 dueTime
 <=
 now
 )
 {
 scheduleFrameLocked
 (
 now
 );
 }
 else
 {
 Message
 msg
 =
 mHandler
 .
 obtainMessage
 (
 MSG_DO_SCHEDULE_CALLBACK
 ,
 action
 );
 msg
 .
 arg1
 =
 callbackType
 ;
 //标记为异步消息
 msg
 .
 setAsynchronous
 (
 true
 );
 mHandler
 .
 sendMessageAtTime
 (
 msg
 ,
 dueTime
 );
 }
 }
 }
上述代码开启了同步屏障,并发送异步消息,UI更新相关的消息是优先级最高的,这样系统会有限处理异步消息。 当然最后要移除同步屏障
 void
 unscheduleTraversals
 ()
 {
 if
 (
 mTraversalScheduled
 )
 {
 mTraversalScheduled
 =
 false
 ;
 // 同步屏障
 mHandler
 .
 getLooper
 ().
 getQueue
 ().
 removeSyncBarrier
 (
 mTraversalBarrier
 );
 mChoreographer
 .
 removeCallbacks
 (
 Choreographer
 .
 CALLBACK_TRAVERSAL
 ,
 mTraversalRunnable
 ,
 null
 );
 }
 }
postSyncBarrier
并设置消息的
setAsynchronous(ture) 异步消息时,target即
为null,这是开启同步屏障的关键。当在消息轮询器Looper在
loop
中循环处理消息时,如若开启了同步屏障,会优先处理其中的异步消息,而阻碍同步消息。
HandlerThread 是什么?
一般有个需求在线程创建一个Looper,主线程可以使用子线程的Looper那么我们要怎样写呢? 根据上述学到的知识,我们可以写出如下代码:
 Thread
 thread
 =
 new
 Thread
 ()
 {
 public
 Looper
 looper
 ;
 @Override
 public
 void
 run
 ()
 {
 //在子线程中使用Handler,去更新UI 必须使用Looper.getMainLooper()
 //因为Handler()构造方法中的,Looper.mylooper()是从ThreadLocal中获取,而ThreadLocal
 //是根据当前的线程获取Looper 在子线程中并没有looper
 Looper
 .
 prepare
 ();
 looper
 =
 Looper
 .
 myLooper
 ();
 threadHandler
 =
 new
 Handler
 (
 looper
 )
 {
 @Override
 public
 void
 handleMessage
 (
 Message
 msg
 )
 {
 Log
 .
 e
 (
 "TAG"
 ,
 "handleMessage: "
 +
 Thread
 .
 currentThread
 ());
 }
 };
 Looper
 .
 loop
 ();
 threadHandler
 .
 sendEmptyMessage
 (
 1
 );
 }
 public
 Looper
 getLooper
 ()
 {
 return
 looper
 ;
 }
 };
 thread
 .
 start
 ();
 threadHandler
 .
 sendEmptyMessage
 (
 1
 );
但是上述代码会出现问题,因为线程是异步启动的,如果threadHandler发送消息,那么threadHandler得到的是null.
Android 提供了一个HandlerThread类,它就是帮助我们创建子线程的Looper: 核心代码如下:
 @Override
 public
 void
 run
 ()
 {
 mTid
 =
 Process
 .
 myTid
 ();
 //在子线程 创建了一个looper
 Looper
 .
 prepare
 ();
 //得到锁
 synchronized
 (
 this
 )
 {
 //赋值
 mLooper
 =
 Looper
 .
 myLooper
 ();
 //然后唤醒所有等待的锁
 notifyAll
 ();
 }
 Process
 .
 setThreadPriority
 (
 mPriority
 );
 onLooperPrepared
 ();
 Looper
 .
 loop
 ();
 mTid
 =
 -
 1
 ;
 }
 public
 Looper
 getLooper
 ()
 {
 if
 (!
 isAlive
 ())
 {
 return
 null
 ;
 }
 // If the thread has been started, wait until the looper has been created.
 //当我们调用getLooper的时候 上锁
 synchronized
 (
 this
 )
 {
 //如果mLooper等于null,那么说明run方法中的mLooper并没有赋值,进入等待 释放锁
 while
 (
 isAlive
 ()
 &&
 mLooper
 ==
 null
 )
 {
 try
 {
 //等待 释放锁 收到通知 将mLooper返回
 wait
 ();
 }
 catch
 (
 InterruptedException
 e
 )
 {
 }
 }
 }
 return
 mLooper
 ;
 }
那么我们可以使用HandlerThread书写如下代码:这样我们就拿到了子线程的looper
 //Thread[main,5,main]
 Log
 .
 e
 (
 "TAG"
 ,
 "onCreate: "
 +
 Thread
 .
 currentThread
 ());
 HandlerThread
 handlerThread
 =
 new
 HandlerThread
 (
 "t1"
 );
 handlerThread
 .
 start
 ();
 threadHandler
 =
 new
 Handler
 (
 handlerThread
 .
 getLooper
 ())
 {
 @Override
 public
 void
 handleMessage
 (
 Message
 msg
 )
 {
 //Thread[t1,5,main]
 Log
 .
 e
 (
 "TAG"
 ,
 "handleMessage: "
 +
 Thread
 .
 currentThread
 ());
 }
 };
 //主线程 向子线程发送消息
 threadHandler
 .
 sendEmptyMessage
 (
 1
 );
IntentService
IntentService : 就是应用了HandlerThread,IntentService所以是在子线程中运行的。
如下核心代码: 在
onCreate
方法中,创建了HandlerThread就是一个子线程的Looper,
onStart()
方法通过创建的handler去发送了消息,最终消息会调用到
onHandleIntent
,那么
onHandleIntent
就是在子线程中运行的。
 @Override
 public
 void
 onCreate
 ()
 {
 super
 .
 onCreate
 ();
 //创建子线程的Looper
 HandlerThread
 thread
 =
 new
 HandlerThread
 (
 "IntentService["
 +
 mName
 +
 "]"
 );
 thread
 .
 start
 ();
 //获取Looper
 mServiceLooper
 =
 thread
 .
 getLooper
 ();
 //创建Handler
 mServiceHandler
 =
 new
 ServiceHandler
 (
 mServiceLooper
 );
 }
 @Override
 public
 void
 onStart
 (
 @Nullable
 Intent
 intent
 ,
 int
 startId
 )
 {
 //发送消息
 Message
 msg
 =
 mServiceHandler
 .
 obtainMessage
 ();
 msg
 .
 arg1
 =
 startId
 ;
 msg
 .
 obj
 =
 intent
 ;
 mServiceHandler
 .
 sendMessage
 (
 msg
 );
 }
 private
 final
 class
 ServiceHandler
 extends
 Handler
 {
 public
 ServiceHandler
 (
 Looper
 looper
 )
 {
 super
 (
 looper
 );
 }
 @Override
 public
 void
 handleMessage
 (
 Message
 msg
 )
 {
 //消息通知
 onHandleIntent
 ((
 Intent
 )
 msg
 .
 obj
 );
 //处理完消息,service自动停止,内存释放
 stopSelf
 (
 msg
 .
 arg1
 );
 }
 }
 //由子类实现此方法
 @WorkerThread
 protected
 abstract
 void
 onHandleIntent
 (
 @Nullable
 Intent
 intent
 );
 //service 停止服务
 public
 final
 void
 stopSelf
 (
 int
 startId
 )
 {
 if
 (
 mActivityManager
 ==
 null
 )
 {
 return
 ;
 }
 try
 {
 mActivityManager
 .
 stopServiceToken
 (
 new
 ComponentName
 (
 this
 ,
 m className
 ),
 mToken
 ,
 startId
 );
 }
 catch
 (
 RemoteException
 ex
 )
 {
 }
 }


