大家好,我是微學AI,今天給大家帶來一個關於虛擬截圖辨識文字的套用,可以運用在多個領域。
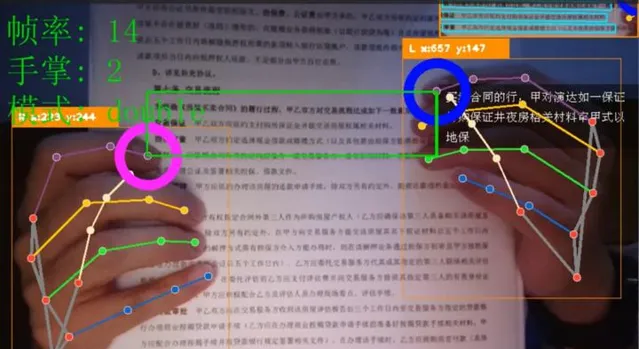
案例主要結合Mediapipe手勢辨識模型,辨識出手勢的21個關鍵點的座標,電腦的網絡攝影機根據食指的座標資訊獲取使用者想要截取的圖片高度與寬度進行截取圖形,截取後的圖片我們可以透過OCR辨識出裏面的文字資訊,或者進行影像的辨識得到圖片中的內容資訊。
一、虛擬截圖的運用:
透過虛擬截圖與OCR結合NLP技術做下遊任務,可以用於紙質檔的實體辨識,閱讀理解,情感分析,機器轉譯等。
多領域的套用場景包括:
企業管理領域:可套用於紙質檔中的文字和表格的提取、公司紙質章程完備性辨識,紙質合約檔資訊提取,即時反饋合約風險資訊、企業報表資訊提取與分析、重要檔圖片截取連線印表機進行局部打印等操作,
教育領域:紙質試卷的批改辨識,以及英文論文或書籍的即時轉譯等任務。
醫學領域:影響報告風險辨識、線上影片問診的藥物資訊辨識采集。
二、套用場景
1.合約風險辨識套用場景:
實作步驟:將檔放於網絡攝影機下,用食指定位要截取長方形圖片的對角線位置,此時利用Mediapipe手勢辨識模型可辨識出兩對角線食指的座標,系統根據座標值對圖片進行截圖操作,獲取使用者想要辨識的文字範圍;透過手勢辨識獲取的截圖圖片,進行影像預處理操作,包括圖片模糊處理、圖片中扭曲文書處理、圖片蓋章浮水印處理等,目的是為了提升OCR的辨識準確率;對處理後的圖片進行OCR辨識,OCR辨識采用現有技術,主要使用文字辨識套件PaddleOCR,模型架構分為文本檢測、文本辨識和方向分類器三部份;圖片透過辨識模型提取出相應的文字資訊;OCR辨識到的文字進行命名實體辨識,抽取辨識文字中的實體,根據業務需求辨識合約中的簽署日期、成交金額、條款資訊。關鍵資訊提取後儲存到後台數據庫,並對比規則庫中的相關指標,對簽署日期、成交金額、條款資訊的合理性進行判斷。

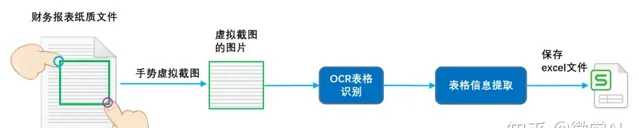
2.財務報表資訊儲存套用場景:
實作步驟:將檔放於網絡攝影機下,用食指定位要截取長方形圖片的對角線位置,此時利用Mediapipe手勢辨識模型可辨識出兩對角線食指的座標,系統根據座標值對圖片進行截圖操作,獲取使用者想要辨識的文字範圍;透過手勢辨識獲取的截圖圖片,進行影像預處理操作,可辨識表格類別的圖片;通針對還有表格的圖片,利用PPStructure結構模型辨識表格資訊,並提取表格的內容與表格的結構。系統將辨識到的文本資訊和表格結構資訊保存為excel檔。
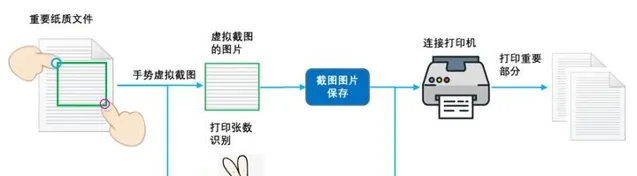
3.重要檔部份打印套用場景
實作步驟:將檔放於網絡攝影機下,用食指定位要截取長方形圖片的對角線位置,此時利用Mediapipe手勢辨識模型可辨識出兩對角線食指的座標,系統根據座標值對圖片進行截圖操作,獲取使用者想要辨識的文字範圍;系統收到截圖後提示保存成功,使用者透過手勢,系統辨識到手勢的數碼,並傳遞打印的張數給系統;透過手勢辨識獲取的截圖圖片,保存截取的圖片可保存本地,用於後續圖片呼叫與管理;啟動連線印表機的主函數,將剛剛保存的圖片進行打印操作。印表機啟動打印使用者的截圖的檔,並按照傳遞的張數進行打印。
三、程式碼實作
 # 匯入OpenCV
import cv2
# 匯入mediapipe
import mediapipe as mp
# 匯入PIL
from PIL import Image, ImageDraw, ImageFont
# 匯入其他依賴包
import time
import math
import numpy as np

from baidu_pp_wrap import Baidu_PP_Detection,Baidu_PP_OCR

# 畫圖類
 class DrawSomeInfo:
 def __init__(self):
 # 模式,double: 雙手,right,single:右手
 self.hand_mode = 'None'
 self.hand_num = 0
 # 記錄左右手的相關資訊
 # 座標
 self.last_finger_cord_x = {'Left': 0, 'Right': 0}
 self.last_finger_cord_y = {'Left': 0, 'Right': 0}
 # 圓環度數
 self.last_finger_arc_degree = {'Left': 0, 'Right': 0}
 # 右手模式
 self.right_hand_circle_list = []
 # 初始化停留時間
 now = time.time()
 self.stop_time = {'Left': now, 'Right': now}
 # 圓環配色
 self.handedness_color = {'Left': (255, 0, 0), 'Right': (255, 0, 255)}

 # 手指浮動允許範圍,需要自己根據相機校準
 self.float_distance = 10

 # 觸發時間
 self.activate_duration = 0.3

 # 單手觸發辨識時間
 self.single_dete_duration = 1
 self.single_dete_last_time = None

 self.last_thumb_img = None

 # 匯入辨識、OCR類
 self.pp_ocr = Baidu_PP_OCR()
 # ocr.test_ocr()

 #self.pp_dete = Baidu_PP_Detection()
 # dete.test_predict_video(0)

 # 上次檢測結果
 self.last_detect_res = {'detection':None,'ocr':'無'}

 # 添加中文
 def cv2AddChineseText(self,img, text, position, textColor=(0, 255, 0), textSize=30):
 if (isinstance(img, np.ndarray)): # 判斷是否OpenCV圖片類別
 img = Image.fromarray(cv2.cvtColor(img, cv2.COLOR_BGR2RGB))
 # 建立一個可以在給定影像上繪圖的物件
 draw = ImageDraw.Draw(img)
 # 字型的格式
 font style = ImageFont.truetype(
 "./fonts/simsun.ttc", textSize, encoding="utf-8")
 # 繪制文本
 draw.text(position, text, textColor, font=font style)
 # 轉換回OpenCV格式
 return cv2.cvtColor(np.asarray(img), cv2.COLOR_RGB2BGR)

 # 生成右上角OCR文字區域
 def generateOcrTextArea(self,ocr_text,line_text_num,line_num,x, y, w, h,frame):
 # First we crop the sub-rect from the image
 sub_img = frame[y:y+h, x:x+w]
 green_rect = np.ones(sub_img.shape, dtype=np.uint8) * 0


 res = cv2.addWeighted(sub_img, 0.5, green_rect, 0.5, 1.0)
 for i in range(line_num):
 text = ocr_text[(i*line_text_num):(i+1)*line_text_num]
 res = self.cv2AddChineseText(res, text, (10,30*i+10), textColor=(255, 255, 255), textSize=18)

 return res

 # 生成Label區域
 def generateLabelArea(self,text,x, y, w, h,frame):

 # First we crop the sub-rect from the image
 sub_img = frame[y:y+h, x:x+w]
 green_rect = np.ones(sub_img.shape, dtype=np.uint8) * 0


 res = cv2.addWeighted(sub_img, 0.5, green_rect, 0.5, 1.0)
 res = self.cv2AddChineseText(res, text, (10,10), textColor=(255, 255, 255), textSize=30)

 return res


 # 生成右上角縮圖
 def generateThumb(self,raw_img,frame):

 # 辨識
 if self.last_detect_res['detection'] == None:
 pass
 # im,results = self.pp_dete.detect_img(raw_img)
 # # 取辨識的第一個物體
 # if len(results['boxes'])>0:
 #
 # label_id = results['boxes'][0][0].astype(int)
 # label_en = self.pp_dete.labels_en[label_id]
 # label_zh = self.pp_dete.labels_zh[label_id-1]
 # self.last_detect_res['detection'] = [label_zh,label_en]
 # else:
 # self.last_detect_res['detection'] = ['無','None']

 # 整圖
 frame_height, frame_width, _ = frame.shape
 #raw_img = frame
 # 覆蓋
 raw_img_h, raw_img_w, _ = raw_img.shape
 #raw_img_w =100
 print(frame.shape)

 thumb_img_w = 300
 thumb_img_h = math.ceil( raw_img_h * thumb_img_w / (raw_img_w+1))

 thumb_img = cv2.resize(raw_img, (thumb_img_w, thumb_img_h))

 rect_weight = 4
 # 在縮圖上畫框框
 thumb_img = cv2.rectangle(thumb_img,(0,0),(thumb_img_w,thumb_img_h),(0, 139, 247),rect_weight)


 # 生成label
 x, y, w, h = (frame_width - thumb_img_w),thumb_img_h,thumb_img_w,50
 # Putting the image back to its position

 # frame[y:y+h, x:x+w] = self.generateLabelArea('{label_zh} {label_en}'.format(label_zh=self.last_detect_res['detection'][0],label_en=self.last_detect_res['detection'][1]),x, y, w, h,frame)
 # OCR
 # 是否需要OCR辨識
 ocr_text = ''
 if self.last_detect_res['ocr'] == '無':

 src_im,text_list = self.pp_ocr.ocr_image(raw_img)
 thumb_img = cv2.resize(src_im, (thumb_img_w, thumb_img_h))

 if len(text_list) > 0 :
 ocr_text = ''.join(text_list)
 # 記錄一下
 self.last_detect_res['ocr']= ocr_text
 else:
 # 檢測過,無結果
 self.last_detect_res['ocr']= 'checked_no'
 else:

 ocr_text = self.last_detect_res['ocr']


 frame[0:thumb_img_h,(frame_width - thumb_img_w):frame_width,:] = thumb_img

 # 是否需要顯示

 if ocr_text != '' and ocr_text != 'checked_no' :

 line_text_num = 15
 line_num = math.ceil(len(ocr_text) / line_text_num)

 y,h = (y+h+20),(32*line_num)
 frame[y:y+h, x:x+w] = self.generateOcrTextArea(ocr_text,line_text_num,line_num,x, y, w, h,frame)


 self.last_thumb_img = thumb_img
 return frame

 # 畫圓環
 def drawArc(self, frame, point_x, point_y, arc_radius=150, end=360, color = (255, 0, 255),width=20):

 img = Image.fromarray(frame)
 shape = [(point_x-arc_radius, point_y-arc_radius),
 (point_x+arc_radius, point_y+arc_radius)]
 img1 = ImageDraw.Draw(img)
 img1.arc(shape, start=0, end=end, fill=color, width=width)
 frame = np.asarray(img)

 return frame
 # 清除單手模式
 def clearSingleMode(self):
 self.hand_mode = 'None'
 self.right_hand_circle_list = []
 self.last_finger_arc_degree = {'Left': 0, 'Right': 0}
 self.single_dete_last_time = None

 # 單手模式
 def singleMode(self,x_distance,y_distance,handedness, finger_cord, frame, frame_copy):

 self.right_hand_circle_list.append( (finger_cord[0],finger_cord[1]) )


 for i in range(len(self.right_hand_circle_list)-1) :
 # 連續畫線
 frame = cv2.line(frame,self.right_hand_circle_list[i],self.right_hand_circle_list[i+1],(255,0,0),5)

 # 取外接矩形
 max_x = max(self.right_hand_circle_list,key=lambda i : i[0])[0]
 min_x = min(self.right_hand_circle_list,key=lambda i : i[0])[0]

 max_y = max(self.right_hand_circle_list,key=lambda i : i[1])[1]
 min_y = min(self.right_hand_circle_list,key=lambda i : i[1])[1]


 frame = cv2.rectangle(frame,(min_x,min_y),(max_x,max_y),(0,255,0),2)
 frame = self.drawArc(
 frame, finger_cord[0], finger_cord[1], arc_radius=50, end=360, color=self.handedness_color[handedness],width=15)
 # 未移動
 if (x_distance <= self.float_distance) and (y_distance <= self.float_distance):
 if (time.time() - self.single_dete_last_time ) > self.single_dete_duration :
 if( (max_y - min_y) > 100) and( (max_x-min_x) > 100):
 print('啟用')
 if not isinstance(self.last_thumb_img, np.ndarray):

 self.last_detect_res = {'detection':None,'ocr':'無'}
 raw_img = frame_copy[min_y:max_y,min_x:max_x,]
 frame = self.generateThumb(raw_img,frame)


 else:
 # 移動,重新計時
 self.single_dete_last_time = time.time() # 記錄一下時間


 return frame

 # 檢查食指停留是否超過0.3秒,超過即畫圖,左右手各自繪制
 def checkIndexFingerMove(self,handedness, finger_cord, frame,frame_copy):

 # 計算距離
 x_distance = abs(finger_cord[0] - self.last_finger_cord_x[handedness])
 y_distance = abs(finger_cord[1] - self.last_finger_cord_y[handedness])

 # 右手釘選模式
 if self.hand_mode == 'single':
 # 單手模式下遇到雙手,釋放
 if self.hand_num == 2:
 self.clearSingleMode()
 elif handedness == 'Right':
 # 進入單手模式
 frame = self.singleMode(x_distance,y_distance,handedness, finger_cord, frame , frame_copy)

 else:
 # 未移動
 if (x_distance <= self.float_distance) and (y_distance <= self.float_distance):
 # 時間大於觸發時間
 if(time.time() - self.stop_time[handedness]) > self.activate_duration:

 # 畫環形圖,每隔0.01秒增大5度
 arc_degree = 5 * ((time.time() - self.stop_time[handedness] - self.activate_duration) // 0.01)
 if arc_degree <= 360:
 frame = self.drawArc(
 frame, finger_cord[0], finger_cord[1], arc_radius=50, end=arc_degree, color=self.handedness_color[handedness], width=15)
 else:
 frame = self.drawArc(
 frame, finger_cord[0], finger_cord[1], arc_radius=50, end=360, color=self.handedness_color[handedness],width=15)
 # 讓度數為360
 self.last_finger_arc_degree[handedness] = 360

 # 這裏執行更多動作
 # 兩個手指圓環都滿了,直接觸發辨識
 if (self.last_finger_arc_degree['Left'] >= 360) and (self.last_finger_arc_degree['Right'] >= 360):
 # 獲取相應座標

 rect_l = (self.last_finger_cord_x['Left'],self.last_finger_cord_y['Left'])
 rect_r = (self.last_finger_cord_x['Right'],self.last_finger_cord_y['Right'])
 # 外框框
 frame = cv2.rectangle(frame,rect_l,rect_r,(0,255,0),2)
 # 框框label
 if self.last_detect_res['detection']:
 # 生成label
 x, y, w, h = self.last_finger_cord_x['Left'],(self.last_finger_cord_y['Left']-50),120,50
 frame[y:y+h, x:x+w] = self.generateLabelArea('{label_zh}'.format(label_zh=self.last_detect_res['detection'][0]),x, y, w, h,frame)

 # 是否需要重新辨識
 if self.hand_mode != 'double':
 # 初始化辨識結果
 self.last_detect_res = {'detection':None,'ocr':'無'}
 # 傳給縮圖
 print(self.last_finger_cord_y['Left'],self.last_finger_cord_y['Right'],self.last_finger_cord_x['Left'],self.last_finger_cord_x['Right'])
 frame_copy = frame

 if self.last_finger_cord_y['Left']>=self.last_finger_cord_y['Right']:
 y_min = self.last_finger_cord_y['Right']
 y_max = self.last_finger_cord_y['Left']
 else:
 y_min = self.last_finger_cord_y['Left']
 y_max = self.last_finger_cord_y['Right']

 if self.last_finger_cord_x['Left'] >= self.last_finger_cord_x['Right']:
 x_min = self.last_finger_cord_x['Right']
 x_max = self.last_finger_cord_x['Left']
 else:
 x_min = self.last_finger_cord_x['Left']
 x_max = self.last_finger_cord_x['Right']


 #raw_img = frame[self.last_finger_cord_y['Left']:self.last_finger_cord_y['Right'],self.last_finger_cord_x['Left']:self.last_finger_cord_x['Right'],]
 raw_img = frame[y_min:y_max,x_min:x_max]

 #cv2.imshow("raw_img", raw_img)
 #cv2.imwrite('result1.png', rotated)
 #cv2.waitKey(0)
 #print(raw_img)
 frame = self.generateThumb(raw_img,frame)

 self.hand_mode = 'double'

 # 只有右手圓環滿,觸發描線功能
 if (self.hand_num==1) and (self.last_finger_arc_degree['Right'] == 360):

 self.hand_mode = 'single'
 self.single_dete_last_time = time.time() # 記錄一下時間
 self.right_hand_circle_list.append( (finger_cord[0],finger_cord[1]) )

 else:
 # 移動位置,重設時間
 self.stop_time[handedness] = time.time()
 self.last_finger_arc_degree[handedness] = 0
 # 重新整理位置
 self.last_finger_cord_x[handedness] = finger_cord[0]
 self.last_finger_cord_y[handedness] = finger_cord[1]

 return frame

# 辨識控制類
 class VirtualFingerReader:
 def __init__(self):
 # 初始化medialpipe
 self.mp_drawing = mp.solutions.drawing_utils
 self.mp_drawing_ styles = mp.solutions.drawing_ styles
 self.mp_hands = mp.solutions.hands

 # image例項,以便另一個類呼叫
 self.image=None

 # 檢查左右手在陣列中的index,這裏需要註意,Mediapipe使用映像的
 def checkHandsIndex(self,handedness):
 # 判斷數量
 if len(handedness) == 1:
 handedness_list = ['Left' if handedness[0]. classification[0].label == 'Right' else 'Right']
 else:
 handedness_list = [handedness[1]. classification[0].label,handedness[0]. classification[0].label]

 return handedness_list


 # 主函數
 def recognize(self):
 # 初始化畫圖類
 drawInfo = DrawSomeInfo()

 # 計算重新整理率
 fpsTime = time.time()

 # OpenCV讀取影片流
 cap = cv2.VideoCapture(0)
 # 影片分辨率
 resize_w = 960
 resize_h = 720

 fps = cap.get(cv2.CAP_PROP_FPS)
 fps = 18
 videoWriter = cv2.VideoWriter('./record_video/out'+str(time.time())+'.mp4', cv2.VideoWriter_fourcc(*'p64'), fps, (resize_w,resize_h))

 with self.mp_hands.Hands(min_detection_confidence=0.7,
 min_tracking_confidence=0.5,
 max_num_hands=2) as hands:
 while cap.isOpened():

 # 初始化矩形
 success, self.image = cap.read()
 self.image = cv2.resize(self.image, (resize_w, resize_h))

 # 需要根據鏡頭位置來調整
 # self.image = cv2.rotate( self.image, cv2.ROTATE_180)


 if not success:
 print("空幀.")
 continue

 # 提高效能
 self.image.flags.writeable = False
 # 轉為RGB
 self.image = cv2.cvtColor(self.image, cv2.COLOR_BGR2RGB)
 # 映像,需要根據鏡頭位置來調整
 # self.image = cv2.flip(self.image, 1)
 # mediapipe模型處理
 results = hands.process(self.image)

 self.image.flags.writeable = True
 self.image = cv2.cvtColor(self.image, cv2.COLOR_RGB2BGR)

 # 保存縮圖
 if isinstance(drawInfo.last_thumb_img, np.ndarray):
 self.image = drawInfo.generateThumb(drawInfo.last_thumb_img,self.image )

 hand_num = 0
 # 判斷是否有手掌
 if results.multi_hand_landmarks:


 # 記錄左右手index
 handedness_list = self.checkHandsIndex(results.multi_handedness)
 hand_num = len(handedness_list)


 drawInfo.hand_num = hand_num

 # 復制一份幹凈的原始frame
 frame_copy = self.image.copy()
 # 遍歷每個手掌
 for hand_index,hand_landmarks in enumerate(results.multi_hand_landmarks):
 # 容錯
 if hand_index>1:
 hand_index = 1


 # 在畫面標註手指
 self.mp_drawing.draw_landmarks(
 self.image,
 hand_landmarks,
 self.mp_hands.HAND_CONNECTIONS,
 self.mp_drawing_ styles.get_default_hand_landmarks_ style(),
 self.mp_drawing_ styles.get_default_hand_connections_ style())

 # 解析手指,存入各個手指座標
 landmark_list = []

 # 用來儲存手掌範圍的矩形座標
 paw_x_list = []
 paw_y_list = []
 for landmark_id, finger_axis in enumerate(
 hand_landmarks.landmark):
 landmark_list.append([
 landmark_id, finger_axis.x, finger_axis.y,
 finger_axis.z
 ])
 paw_x_list.append(finger_axis.x)
 paw_y_list.append(finger_axis.y)
 if landmark_list:
 # 比例縮放到像素
 ratio_x_to_pixel = lambda x: math.ceil(x * resize_w)
 ratio_y_to_pixel = lambda y: math.ceil(y * resize_h)

 # 設計手掌左上角、右下角座標
 paw_left_top_x,paw_right_bottom_x = map(ratio_x_to_pixel,[min(paw_x_list),max(paw_x_list)])
 paw_left_top_y,paw_right_bottom_y = map(ratio_y_to_pixel,[min(paw_y_list),max(paw_y_list)])


 # 獲取食指指尖座標
 index_finger_tip = landmark_list[8]
 index_finger_tip_x =ratio_x_to_pixel(index_finger_tip[1])
 index_finger_tip_y =ratio_y_to_pixel(index_finger_tip[2])


 # 獲取中指指尖座標
 middle_finger_tip = landmark_list[12]
 middle_finger_tip_x =ratio_x_to_pixel(middle_finger_tip[1])
 middle_finger_tip_y =ratio_y_to_pixel(middle_finger_tip[2])

 # 畫x,y,z座標
 label_height = 30
 label_wdith = 130
 cv2.rectangle(self.image,(paw_left_top_x-30,paw_left_top_y-label_height-30),(paw_left_top_x+label_wdith,paw_left_top_y-30),(0, 139, 247),-1)

 l_r_hand_text = handedness_list[hand_index][:1]

 cv2.putText(self.image, "{hand} x:{x} y:{y}".format(hand=l_r_hand_text,x=index_finger_tip_x,y=index_finger_tip_y) , (paw_left_top_x-30+10,paw_left_top_y-40),
 cv2.FONT_HERSHEY_PLAIN, 1, (255, 255, 255), 2)

 # 給手掌畫框框
 cv2.rectangle(self.image,(paw_left_top_x-30,paw_left_top_y-30),(paw_right_bottom_x+30,paw_right_bottom_y+30),(0, 139, 247),1)

 # 釋放單手模式
 line_len = math.hypot((index_finger_tip_x-middle_finger_tip_x),(index_finger_tip_y-middle_finger_tip_y))

 if line_len < 50 and handedness_list[hand_index] == 'Right':
 drawInfo.clearSingleMode()
 drawInfo.last_thumb_img = None

 # 傳給畫圖類,如果食指指尖停留超過指定時間(如0.3秒),則啟動畫圖,左右手單獨畫
 self.image = drawInfo.checkIndexFingerMove(handedness_list[hand_index],[index_finger_tip_x,index_finger_tip_y],self.image,frame_copy)


 # 顯示重新整理率FPS
 cTime = time.time()
 fps_text = 1/(cTime-fpsTime)
 fpsTime = cTime
 self.image = drawInfo.cv2AddChineseText(self.image, "幀率: " + str(int(fps_text)), (10, 30), textColor=(0, 255, 0), textSize=50)
 self.image = drawInfo.cv2AddChineseText(self.image, "手掌: " + str(hand_num) , (10, 90), textColor=(0, 255, 0), textSize=50)
 self.image = drawInfo.cv2AddChineseText(self.image, "模式: " + str(drawInfo.hand_mode), (10, 150), textColor=(0, 255, 0), textSize=50)


 # 顯示畫面
 # self.image = cv2.resize(self.image, (resize_w//2, resize_h//2))
 cv2.imshow('virtual reader', self.image)
 videoWriter.write(self.image)
 if cv2.waitKey(5) & 0xFF == 27:
 break
 cap.release()


# 開始程式
control = VirtualFingerReader()
control.recognize()
程式碼執行, 可以虛擬截圖文本資訊,然後進行OCR辨識。
透過OCR辨識後的文字,大家可以執行發揮下遊的任務,用處很多,完整程式碼可以私信獲取哦。
往期作品:
深度學習實戰專案
1.深度學習實戰1-(keras框架)企業數據分析與預測
2.深度學習實戰2-(keras框架)企業信用評級與預測
3.深度學習實戰3-文本摺積神經網絡(TextCNN)新聞文本分類
4.深度學習實戰4-摺積神經網絡(DenseNet)數學圖形辨識+題目模式辨識
5.深度學習實戰5-摺積神經網絡(CNN)中文OCR辨識專案
6.深度學習實戰6-摺積神經網絡(Pytorch)+聚類分析實作空氣質素與天氣預測
7.深度學習實戰7-電商產品評論的情感分析
8.深度學習實戰8-生活照片轉化漫畫照片套用
9.深度學習實戰9-文本生成影像-本地電腦實作text2img
10.深度學習實戰10-數學公式辨識-將圖片轉換為Latex(img2Latex)
11.深度學習實戰11(進階版)-BERT模型的微調套用-文本分類案例
12.深度學習實戰12(進階版)-利用Dewarp實作文本扭曲矯正
13.深度學習實戰13(進階版)-文本糾錯功能,經常寫錯別字的小夥伴的福星
14.深度學習實戰14(進階版)-手寫文字OCR辨識,手寫筆記也可以辨識了
15.深度學習實戰15(進階版)-讓機器進行閱讀理解+你可以變成出題者提問
16.深度學習實戰16(進階版)-虛擬截圖辨識文字-可以做紙質合約和表格辨識
17.深度學習實戰17(進階版)-智能輔助編輯平台系統的搭建與開發案例
18.深度學習實戰18(進階版)-NLP的15項任務大融合系統,可實作市面上你能想到的NLP任務
19.深度學習實戰19(進階版)-ChatGPT的本地實作部署測試,自己的平台就可以實作ChatGPT
...(待更新)


