#機器人編程實戰
#人工智慧影像分割
#自動駕駛機器人DIY
我所在的小區的水站比較遠,每次飲用完桶裝水後,都得扛著約19升的水往回跑,最近我甚至用兒童乘用車來解決這個費力的事情。但這也不是長久之計,近幾天我又萌生了DIY一輛自動駕駛機器人,能辨識道路,能進出樓電梯。盡管這看起來很遙遠,但我仍然決定行動,當我想象著機器人拉水並進樓的場景,我激動的竟然笑了起來。
設計方案
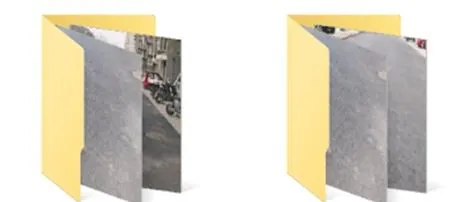
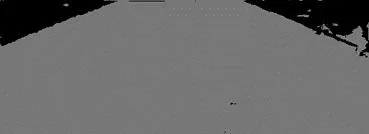
區的戶外場景假設如圖所示:
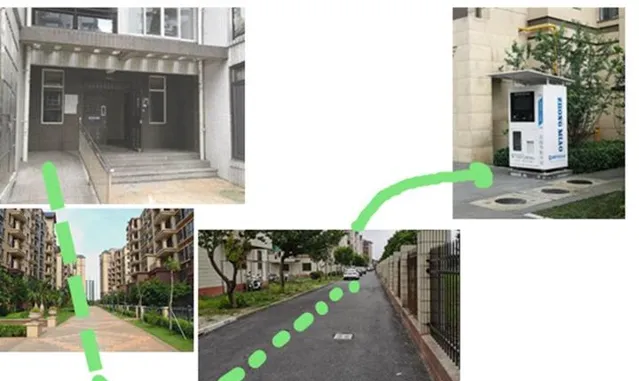
需要解決和構成挑戰的問題有:
從單元門出來後的上下坡問題,既剎得住車又有足夠的動力上去;
能在小區道路行駛避免撞到石磚和兩邊停的汽車;
經過1公裏的行駛最後安全到達水站;
假設第一個問題先暫時擱置,先解決路上行駛和避障問題。
這裏選擇考慮影像視覺中的道路辨識來解決在正確上的道路上行駛的問題。如果小區沒有轎車避障可能也不需要考慮,但現實中道路是有轎車存在的,可以加雷達等測距傳感器增加避障功能,或許也可以透過增加機器人和辨識出來的道路邊界之間的距離以避免碰撞,第二種方案的要求就是對道路辨識的準確性有很高的要求了。
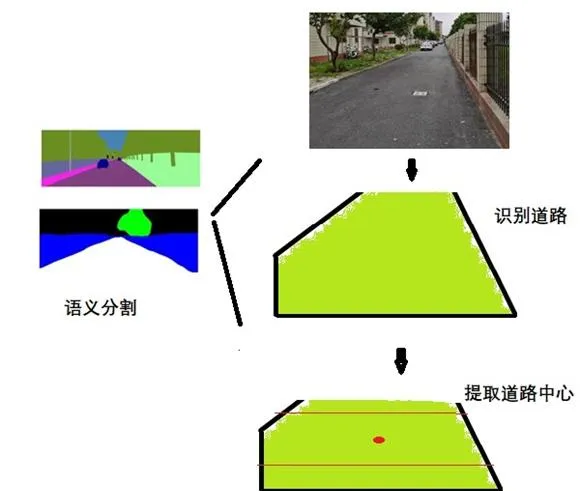
最後使用語意分割將從網路攝影機讀取的圖片中對道路辨識,去掉幹擾的背景。然後提取辨識道路的中心,機器人要不斷的調整姿態以便使鏡頭中心和道路中心在一條線上,這樣可以最大程度的避免碰撞並安全行駛。
道路的行駛需要標記數據,這屬於有監督學習的一種,所以接下來的工作就是收集特定的道路數據並標記了。
準備硬體
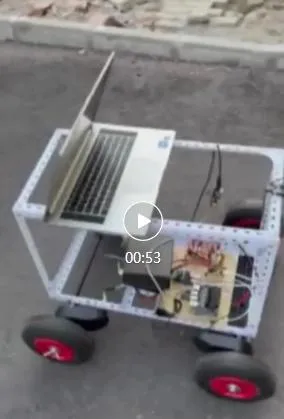
我們的硬體機器人需要足夠大的負載和動力,這裏選擇之前DIY好的童車改裝機器人,使用4輪共計120W功率的電機驅動。

收集數據和標註數據
由於在特殊的場景下完成功能,仿真在此類情況下應該不考慮,最終還是需要執行機器人實體采集圖片數據。為了達到預期的即時性,網路攝影機采集的圖片大小為640x480,這裏裁剪成512x256。
編寫collect_image.py完成網路攝影機采集視訊。
 import cv2


#是否保存為AVI視訊
if args.savevideo:
 out = cv2.VideoWriter("road" + ".avi", cv2.VideoWriter_fourcc('M','J','P','G'),10,(512,256))
#開始捕獲網路攝影機視訊流
cap = cv2.VideoCapture('/dev/video0')
print("camera connected!")
while True:
 client.loop()#1s鐘的阻塞
 #img = get_video()
 ret, img = cap.read()
 if not ret:
 break
 #重新裁剪大小
 img = cv2.resize(img,(512,256))
 if _switch == 0:#如果為0 直接重頭開始
 continue
 #cv2.imshow("IN", img)
 #是否寫入保存的檔
 if args.savevideo:
 out.write(img)
 #每1秒鐘采集一次
 cv2.imwrite("img/%d.jpg"%framecount, img)
 framecount += 1
程式中加入mqtt 實作遠端啟動采集功能。
 from paho.mqtt import client as mqtt_client
#MQTT相關
broker = '127.0.0.1'
port = 1883
topic = "/camera/collect"
client_id ='python-mqtt-{}'.format(random.randint(0, 1000))
#接收開關
_switch =0
def on_connect(client, userdata, flags, rc):
 print("Connected with result code "+str(rc))
 client.subscribe("test")

def on_message(client, userdata, msg):
 global _switch
 #print(msg.topic+" "+msg.payload.decode("utf-8"))
 _switch = ord(msg.payload.decode("utf-8"))-48
 print("%d"%_switch)
def publish(client):
 msg_count = 0
 while True:
 time.sleep(1)
 msg = f"messages: {msg_count}"
 result = client.publish(topic, msg)
 # result: [0, 1]
 status = result[0]
 if status == 0:
 print(f"Send `{msg}` to topic `{topic}`")
 else:
 print(f"Failed to send message to topic {topic}")
 msg_count += 1
client.on_connect = on_connect
client.on_message = on_message
client.connect(broker, port, 60)
# 訂閱主題
client.subscribe(topic)
完整的程式:
 import os
import sys
import argparse
import cv2
import datetime
from paho.mqtt import client as mqtt_client
import random
#MQTT相關
broker = '127.0.0.1'
port = 1883
topic = "/camera/collect"
client_id ='python-mqtt-{}'.format(random.randint(0, 1000))
#接收開關
_switch =0
#參數相關
parser=argparse.ArgumentParser(description='collect data')
parser.add_argument('--savevideo',type=str,default='', help='save incoming video')
args = parser.parse_args()
print(args)
#定義mqtt的client
client = mqtt_client.Client(client_id)


def on_connect(client, userdata, flags, rc):
 print("Connected with result code "+str(rc))
 client.subscribe("test")

def on_message(client, userdata, msg):
 global _switch
 #print(msg.topic+" "+msg.payload.decode("utf-8"))
 _switch = ord(msg.payload.decode("utf-8"))-48
 print("%d"%_switch)
def publish(client):
 msg_count = 0
 while True:
 time.sleep(1)
 msg = f"messages: {msg_count}"
 result = client.publish(topic, msg)
 # result: [0, 1]
 status = result[0]
 if status == 0:
 print(f"Send `{msg}` to topic `{topic}`")
 else:
 print(f"Failed to send message to topic {topic}")
 msg_count += 1
client.on_connect = on_connect
client.on_message = on_message
client.connect(broker, port, 60)
# 訂閱主題
client.subscribe(topic)
#client.loop_forever()
framecount = 0
#是否保存為AVI視訊
if args.savevideo:
 out = cv2.VideoWriter("road" + ".avi", cv2.VideoWriter_fourcc('M','J','P','G'),10,(512,256))
#開始捕獲網路攝影機視訊流
cap = cv2.VideoCapture('/dev/video0')
print("camera connected!")
while True:
 client.loop()#1s鐘的阻塞
 #img = get_video()
 ret, img = cap.read()
 if not ret:
 break
 #重新裁剪大小
 img = cv2.resize(img,(512,256))
 if _switch == 0:#如果為0 直接重頭開始
 continue
 #cv2.imshow("IN", img)
 #是否寫入保存的檔
 if args.savevideo:
 out.write(img)
 #每1秒鐘采集一次
 cv2.imwrite("img/%d.jpg"%framecount, img)
 framecount += 1
最後,簡單的再編寫一個html的web小程式用於實作手機的網頁控制和檢視。
手機的控制界面如圖:
最終控制機器人采集路面道路情況,行駛1圈後,總共采集1200張圖片。
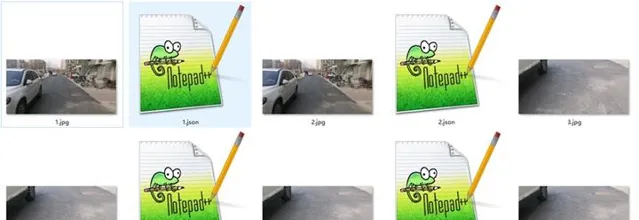
透過篩選去除一些模糊的,再進行7:3的訓練和驗證分類。
如圖
最終整理完畢,下一步就該標註了。
這裏使用基於Ubuntu的labelme標註。如果系統中m沒有安裝可以使用指令安裝
pip install pyqt5 labelme
在標記之前為了避免大量工作量,選擇使用Pascal VOC 2012 的格式檔,這樣省去時間提高效率。首先在檔路徑下新建2個檔,檔分別是Colors.txt和 classes.txt.
Colors.txt隔行放的內容是 RGB顏色的數值。
0 0 0
0 255 0
而 classes.txt放的是辨識的物體標簽。這裏只有兩類分別是路和背景。
background
road
這樣,路辨識為綠色,背景辨識為黑色。
接著在shell中透過指令開啟labelme,
labelme --labels classes.txt
接在shell中開啟 labelme ,選擇左側的【open Dir】將所有的檔匯入,然後使用左側【create polygons】建立多邊形選項,標記道路,標記完成後彈出的視窗中選擇‘road’完成。
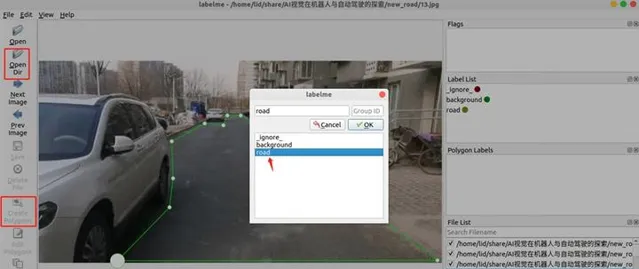
單擊【ok】後並保存為相應的json檔,繼續下一張。
然後需要透過指令碼將json檔轉換為png格式的掩碼。
註意:pip install -U labelme 重新整理labelme 最新版本為labelme-5.1.1
使用指令:
pytorch-segmentation$ python3 labelme2voc.py ../new_road../new_road_mask/--labels ../ classes.txt --noviz
最後按照第3章節的標註工具數據集中,無論Pascal VOC 2020 數據集還是註釋自己的影像然後需要轉換為 Pascal VOC 數據集格式,都會自動產生兩個目錄資料夾:
JPEGImages和Segmentation class。
lid@LAPTOP-85KPM8J9:/mnt/e/AI視覺在機器人與自動駕駛的探索/new_road_mask$ tree -L 1
.
├── JPEGImages
└── Segmentation class
2 directories, 0 files
JPEGImages應該包含影像,Segmentation class應該包含.png格式的註釋/掩碼。

接下來,我們會將這些數據拆分為訓練和驗證拆分。同樣使用pytorch-segmentation資料夾下的split_custom.py指令碼將數據拆分成ADE20K的數據集格式。
pytorch-segmentation$ python3 split_custom.py
--masks=../new_road_mask/Segmentation class/ --images=../new_road_mask/JPEGImages/ --output=../road_datas --keep-original
#開始執行
SPLIT: 39 train and 10 validation images!
Writing images to the training and validation folders...
…
Writing masks to the training and validation folders...
…
Done!
最後生成的檔目錄為
 /road_datas$ tree -L 3
.
├── annotations
│ ├── training
│ │ ├── 1.png
 ...
│ │ └── 97.png
│ └── validation
│ ├── 104.png
 ...
│ └── 446.png
└── images
 ├── training
 │ ├── 1.jpg
 ...
 │ └── 97.jpg
 └── validation
 ├── 104.jpg
 ...
 └── 446.jpg
Annotations資料夾下有trainning的掩碼檔PNG,validation則是需要驗證的檔。
Images下存放的是原始檔。該結構目錄屬於MIT的ADE20K數據集格式。
到這裏,收集數據和標註基本完成了。
開發程式並訓練模型
有了數據開始編寫一個神經網路模型,使用現有的語意分割主幹網路resnet系列,resnet系列有resnet18、resnet50 、resnet101,考慮到要將模型部署到嵌入式jetson nano中,根據其效能建議使用resnet18.
Pytorch支持分割模型segnet、pspnet、enet、deeplab v3 、u-net、fcn等。可以根據需要選擇合適的使用。
事實上,PyTorch 提供了四種不同的語意分割模型。它們是 FCN-ResNet50、FCN -ResNet101、DeepLabV3- ResNet50 和 DeepLabV3- ResNet101。
輝達提供了fcn-resnet18 、fcn-alexnet等影像分割的預訓練模型。由於最終在jetson nano上執行可以將fcn-resnet18 預訓練模型直接用來訓練數據集。
第一個基於pytorch影像分割的包:
https:// github.com/yassouali/py torch-segmentation#config-file-format
pytorch 訓練檔trainer.py 的核心部份如下:
 #訓練
 def _train_epoch(self, epoch):
 self.logger.info('\n')
 #初始化
 self.model.train()
 if self.config['arch']['args']['freeze_bn']:
 if isinstance(self.model, torch.nn.DataParallel): self.model.module.freeze_bn()
 else: self.model.freeze_bn()
 self.wrt_mode = 'train'

 tic = time.time()
 self._reset_metrics()
 tbar = tqdm(self.train_loader, ncols=130)
 for batch_idx, (data, target) in enumerate(tbar):
 self.data_time.update(time.time() - tic)
 #data, target = data.to(self.device), target.to(self.device)
 self.lr_scheduler.step(epoch=epoch-1)

 # 最佳化器清零
 self.optimizer.zero_grad()
 output = self.model(data)#獲取輸出
 if self.config['arch']['type'][:3] == 'PSP':#區分PSPnet 架構不一樣
 assert output[0].size()[2:] == target.size()[1:]
 assert output[0].size()[1] == self.num_ classes
 loss = self.loss(output[0], target)#獲取輸出預目標值的損失值
 loss += self.loss(output[1], target) * 0.4
 output = output[0]
 else:#其他net
 assert output.size()[2:] == target.size()[1:]
 assert output.size()[1] == self.num_ classes
 loss = self.loss(output, target)#獲取輸出預目標值的損失值

 if isinstance(self.loss, torch.nn.DataParallel):
 loss = loss.mean()
 loss.backward()#bp逆傳播
 self.optimizer.step()#最佳化器步進叠代
 self.total_loss.update(loss.item())
該工程使用config.json完成配置。無論我們提供什麽影像作為輸入,我們都必須使用mean = [0.485, 0.456, 0.406] 和 對 std = [0.229, 0.224, 0.225]。如果你是一名普通的深度學習從業者,那麽你一定知道這一點。每當我們使用預訓練模型進行評估時,我們都必須使用訓練過的數據集的均值和標準差。
Config.json檔如下:
 {
 "name": "PSPNet",
 "n_gpu": 1,
 "use_synch_bn": false,

 "arch": {
 "type": "PSPNet",
 "args": {
 "backbone": "resnet18",
 "freeze_bn": false,
 "freeze_backbone": false
 }
 },

 "train_loader": {
 "type": "ADE20K",
 "args":{
 "data_dir": "../road_datas",
 "batch_size": 8,

 "augment": false,
 "shuffle": false,
 "scale": false,
 "flip": false,
 "rotate": false,
 "blur": false,
 "split": "training",
 "num_workers": 1
 }
 },

 "val_loader": {
...
Split要和實際檔一致,
和ADE20k解析檔要一致。
 class ADE20KDataset(BaseDataSet):
 """
 ADE20K dataset
 http://groups.csail.mit.edu/vision/datasets/ADE20K/
 """
 def __init__(self, **kwargs):
 self.num_ classes = 2
 self.palette = palette.ADE20K_palette
 super(ADE20KDataset, self).__init__(**kwargs)

 def _set_files(self):
 if self.split in ["training", "validation"]:
 self.image_dir = os.path.join(self.root, 'images', self.split)
 print(self.image_dir)
 self.label_dir = os.path.join(self.root, 'annotations', self.split)
 print(self.label_dir)
 self.files = [os.path.basename(path).split('.')[0] for path in glob(self.image_dir + '/*.jpg')]
 else: raise ValueError(f"Invalid split name {self.split}")

 def _load_data(self, index):
 image_id = self.files[index]
 image_path = os.path.join(self.image_dir, image_id + '.jpg')
 label_path = os.path.join(self.label_dir, image_id + '.png')
 image= np.asarray(Image.open(image_path).convert('RGB'), dtype=np.float32)
 label = np.asarray(Image.open(label_path), dtype=np.int32) #- 1 # from -1 to 149
 return image, label, image_id
使用指令訓練
python train.py --config config.json
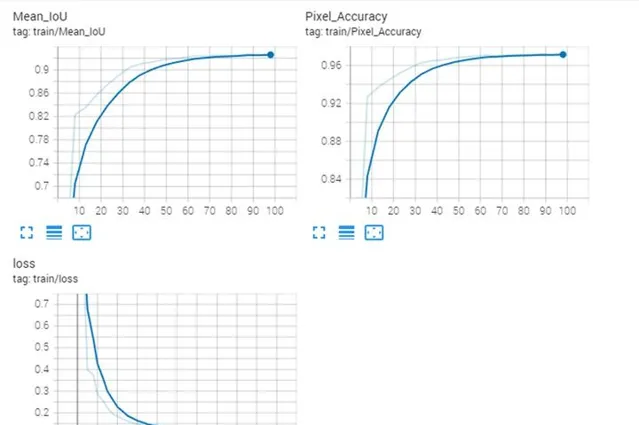
經過一段時間完成訓練,並保存pth模型檔。
 ## Info for epoch 20 ##
 val_loss : 0.08958
 Pixel_Accuracy : 0.96
 Mean_IoU : 0.9169999957084656
 class_IoU : {0: 0.894, 1: 0.939}

Saving a checkpoint: saved/PSPNet\02-23_16-48\checkpoint-epocp0.pth ...
Saving current best: best_model.pth
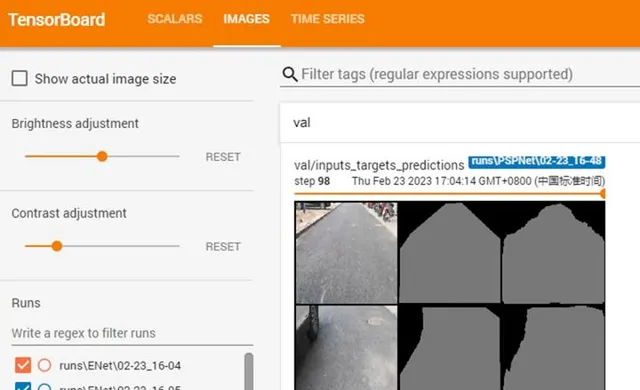
使用tensorboard 視覺化訓練結果並分析總結
tensorboard --logdir saved
瀏覽器輸入
http://localhost:6006/
測試和驗證
透過比較訓練幾種模型現總結表現如下
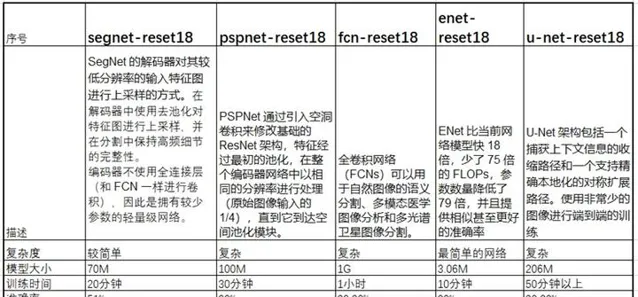
該表總結了訓練的一些結果,fcn-resnet18的模型檔將近1G,有些不可思議。輝達最佳化後的僅有40M。
部份訓練的效果如下圖:
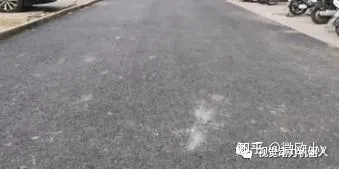
原圖

ENET結果
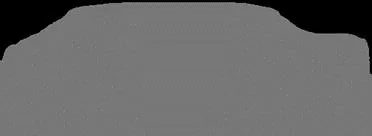
PSPNET結果
UNET結果
透過結果來看,PSPnet是相對較好的,UNET存在斑點,ENENT邊界模糊。另外在訓練機推理時間秒級以上,達不到即時性。
訓練機的環境如下:
 (PYTORCH) C:\Users\by>
(PYTORCH) C:\Users\by>pip list
Package Version Location
----------------------- ------------------- ------------------
absl-py 0.13.0
antlr4-python3-runtime 4.8
appdirs 1.4.4
black 21.4b2
cachetools 4.2.2
certifi 2021.5.30
cffi 1.15.1
charset-normalizer 2.0.4
click 8.0.1
cloudpickle 1.6.0
colorama 0.4.4
cycler 0.10.0
Cython 0.29.24
future 0.18.2
fvcore 0.1.5.post20210730
google-auth 1.34.0
google-auth-oauthlib 0.4.5
graphviz 0.20.1
grpcio 1.39.0
hiddenlayer 0.3
hydra-core 1.1.0
idna 3.2
imageio 2.25.1
importlib-metadata 4.6.3
importlib-resources 5.2.2
iopath 0.1.9
joblib 1.2.0
kiwisolver 1.3.1
Markdown 3.3.4
matplotlib 3.4.2
mkl-fft 1.3.0
mkl-random 1.2.2
mkl-service 2.4.0
mypy-extensions 0.4.3
networkx 2.6.3
numpy 1.20.3
oauthlib 3.1.1
olefile 0.46
omegaconf 2.1.0
opencv-python 4.5.3.56
packaging 23.0
pathspec 0.9.0
Pillow 9.4.0
pip 21.1.3
portalocker 2.3.0
protobuf 3.17.3
pyasn1 0.4.8
pyasn1-modules 0.2.8
pycocotools 2.0.2
pycparser 2.21
pydot 1.4.2
pygame 2.1.2
pymunk 6.4.0
pyparsing 2.4.7
python-dateutil 2.8.2
PyWavelets 1.3.0
pywin32 301
PyYAML 5.4.1
regex 2021.7.6
requests 2.26.0
requests-oauthlib 1.3.0
rsa 4.7.2
scikit-image 0.19.3
scikit-learn 1.0.2
scipy 1.7.3
setuptools 52.0.0.post20210125
six 1.16.0
sklearn 0.0
tabulate 0.8.9
tensorboard 2.5.0
tensorboard-data-server 0.6.1
tensorboard-plugin-wit 1.8.0
termcolor 1.1.0
threadpoolctl 3.1.0
tifffile 2021.11.2
toml 0.10.2
torch 1.8.1
torchaudio 0.8.1
torchvision 0.9.1
torchviz 0.0.2
tqdm 4.62.0
typed-ast 1.4.3
typing-extensions 3.10.0.0
urllib3 1.26.6
Werkzeug 2.0.1
wheel 0.36.2
wincertstore 0.2
yacs 0.1.8
zipp 3.5.0
Jetson nano 機器人終端移植
透過上一節的工作,已經生產了多個模型檔,現在需要將這些模型檔放到機器人終端上。
這個過程稱為模型部署。
雖然model_best.pth檔可以在jetson中使用pytorch執行。但這應該不是最佳的方式,通常在嵌入式中,c/c++ 的程式是比較符合即時執行的。jetson-inference 庫在背景執行 TensorRT,利用它使模型 與TensorRT 相容,可以將其轉換為ONNX格式。
ONNX 是微軟與 Facebook 共同開發的一種開放格式,允許開發人員輕松地在不同框架之間移動他們的機器學習模型。
接下來將嘗試pytorch 和onnx、及opencv dnn介面探索他們的推理時間。
Jetson-inference提供fcn-resnet18的預訓練模型,所以從官網下載該模型和相關的訓練庫。
使用指令
python train.py ../road_datas --dataset=custom
生成best_model.pth
該路徑下使用指令轉換成onnx.
python onnx_export.py
使用segnet.py 推理使用
lid@lid-desktop:~/jetson-inference/python/examples$ ./segnet.py --network=fcn-resnet18-cityscapes --visualize=mask "img/*.jpg" img/test/%i.jpg
結果符合預期,道路顯示為綠色

cuda速度為38ms.
 [TRT] ------------------------------------------------
[TRT] Timing Report /usr/local/bin/networks/FCN-ResNet18-Cityscapes-512x256/fcn_resnet18.onnx
[TRT] ------------------------------------------------
[TRT] Pre-Process CPU 0.06755ms CUDA 1.45417ms
[TRT] Network CPU 62.30220ms CUDA 60.65453ms
[TRT] Post-Process CPU 0.07073ms CUDA 0.07016ms
[TRT] Visualize CPU 0.07052ms CUDA 7.91490ms
[TRT] Total CPU 62.51100ms CUDA 70.09375ms
[TRT] ------------------------------------------------

[image] loaded 'img/217.jpg' (512x256, 3 channels)
[image] saved 'img/test/5.jpg' (512x256, 3 channels)

[TRT] ------------------------------------------------
[TRT] Timing Report /usr/local/bin/networks/FCN-ResNet18-Cityscapes-512x256/fcn_resnet18.onnx
[TRT] ------------------------------------------------
[TRT] Pre-Process CPU 0.06828ms CUDA 1.18714ms
[TRT] Network CPU 32.22916ms CUDA 30.79021ms
[TRT] Post-Process CPU 0.29073ms CUDA 0.28557ms
[TRT] Visualize CPU 0.75038ms CUDA 6.22443ms
[TRT] Total CPU 33.33856ms CUDA 38.48734ms
[TRT] ------------------------------------------------
下一步,實車驗證中......
【輪式自主移動機器人編程實戰】圖書作者,專註人工智慧與機器人的基礎套用


